
Cleaning and Preparing Your Brick House
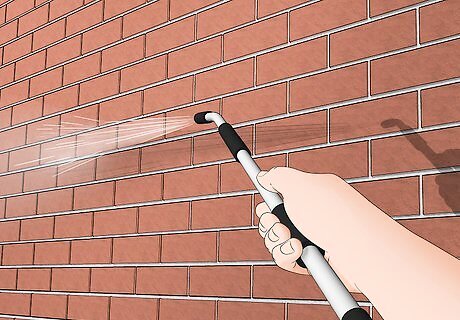
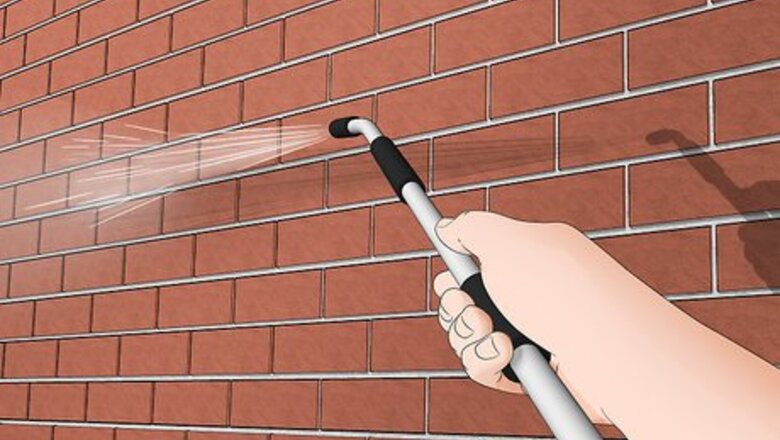
Clean the bricks thoroughly with a cleaning mixture. Start by spraying the brick surface with a hose—water is typically effective at removing most dirt and dust from bricks. For tougher dirt and salt deposits, use a stiff-bristled brush dipped in a soap water mixture. If this isn't doing the trick, mix ⁄2 cup (120 mL) of trisodium phosphate into 1 gallon (3.8 L) of water to create a cleaning solution and dip your brush into it before scrubbing the brick. Apply a solution of 1 part bleach and 3 parts water to mildew and let it sit for 30 minutes. Afterward, scrub the surface with a wire brush. Consider renting a 1500 PSI pressure washer from a home improvement store for larger areas of brick. Never clean brick with acid cleaning solutions or you might ruin the paint job.
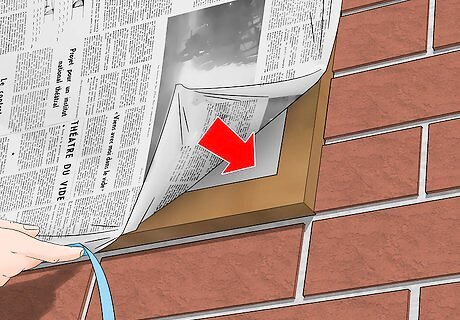
Cover the windows and doors with newspaper. Place unfolded pieces of newspaper over your doors and windows and tape them to the perimeter with painters tape. For larger areas, use multiple pieces of newspaper. Be sure to cover their entire surface and fasten the newspaper firmly with painter's tape. Protect any other areas that you do not want to paint—such as gas meters—with painter's tape or newspaper fastened with painter's tape.

Repair wall cracks using acrylic caulk. Insert a scraper into the cracks and lever them to open them wider. After, brush out the dust with a straw cleaning brush. Cut your caulking tube at a 45-degree angle, taking care to keep the hole size small – no further down than ⁄4 inch (0.64 cm). Insert the tube into your caulking gun, hold the release trigger, and pull the steel rod back as far as you can. Now, press the trigger and move the tip steadily through the crack until it's filled. Allow the caulk to dry for about 5 hours. Press the caulk flat into the cracks with a putty knife to even it with the wall. Be sure to move the gun in steady motions. If you move too fast, the caulk will be thin and uneven, but if you move too slow it will be clumpy and difficult to work with.
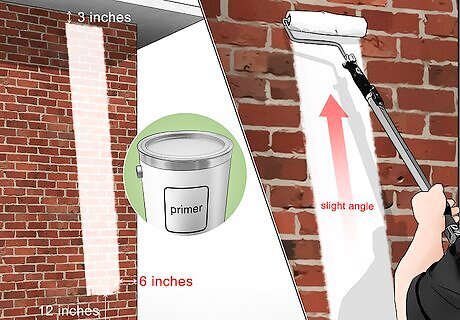
Apply masonry primer to the surface of the bricks. Dip a paint roller into the primer 2 to 3 times. Start around 1 foot (0.30 m) from the bottom of the wall and about 6 inches (15 cm) from the corner. Aim your roll upwards at a small angle while applying light pressure. Once you reach 2 to 3 inches (5.1 to 7.6 cm) from the top of the wall, roll up and down while moving back to the corner. Continue moving from the floor to the top and always move ¾ the width of the roller so each stroke overlaps. Continue rolling until all of the bricks are covered. Put a few extra coats of primer on the areas that were affected by efflorescence. Wait for the primer to dry—the recommended drying time should be listed on the package—before moving on to the next step.
Painting Your Home

Purchase elastomeric paint for the highest level of durability. Elastomeric paint is more expensive than acrylic paint, but outperforms 100 percent acrylic paint by about 2 to 1. It is resistant to heat, cold, wind-driven rain, and sunlight, making it ideal for outdoor application. Elastomeric paint is also dense enough to fill in cracks in the bricks, but you will need to apply 2 coats. If you live in a region prone to inclement weather, elastomeric paint will do the best job protecting your home's brick surface.

Go with acrylic latex paint for a cheaper paint alternative. Acrylic paint is cheaper than elastomeric paint. It's also great for outdoor brick painting since it allows moisture to leave the surface of the bricks and helps to prevent mildew. If you use acrylic paint, you only need to apply 1 coat. The only time you should apply a second coat of acrylic paint is if you can see spots of white wall behind the first layer.

Opt for semi-gloss or high-gloss paint to accentuate surface detail. For regions exposed to a high degree of moisture and dirt, semi-gloss and high-gloss paint are ideal. Not only that, these paints are also easier to clean in the long run—just wipe the surface with a rag and all-purpose cleaner. Keep in mind that semi-gloss and high-gloss paints are harder to touch-up, so take extra care to avoid streaks and brush marks when painting.
Paint your brick house with a paint roller for smaller brick surfaces. Start by dipping your roller into the paint 2 to 3 times. As with priming, begin painting 1 foot (0.30 m) from the bottom of the wall and 6 inches (15 cm) from the corner. Start rolling up at a slight angle and apply light pressure to the brick. After your reach 2 to 3 inches (5.1 to 7.6 cm) from the top of the wall, roll downward back to the corner you started. Continue this pattern while moving ¾ the width of the roller so that your strokes overlap. Use a ladder if your wall is too high for you to reach the top. Make sure that your roller has a thick nap to best deal with the surface irregularities common with bricks.
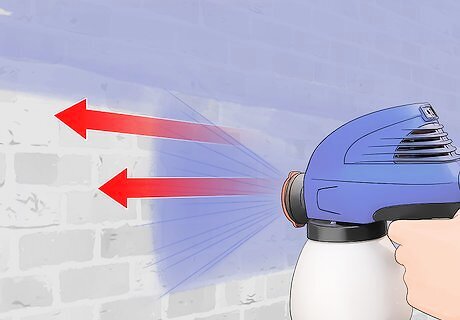
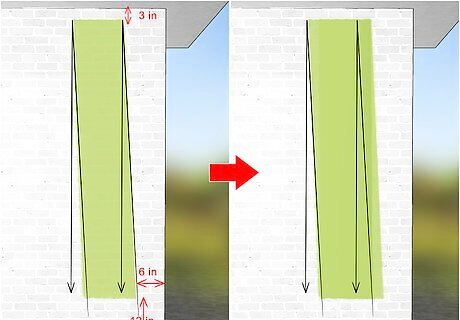
Spray your brick wall with a paint sprayer for larger brick surfaces. Choose a vertical spray pattern that creates a thin, tall oval of paint from the nozzle. Select a corner to start in and hold the tip 6 to 12 inches (15 to 30 cm) from the brick. Start spraying side to side, taking care to overlap each strip of paint about ½ of the spray pattern. Maintain a consistent speed and avoid arching the paint at the end of each stroke. Adjust your speed of movement and your distance from the wall to ensure even coverage. Use a paintbrush over drips as soon as you see them. Afterward, lightly spray over the brush marks until they disappear. Angle a work light to the brick to illuminate the paint and help you see regions that need more. To paint corners, hold the gun sideways and paint along them vertically as opposed to side to side across them. If your coating is too thick, move the gun faster, select a smaller tip, or move farther back—no farther than 12 inches (30 cm). If it's too thin, move the gun slower, select a larger tip, or move the gun closer to the surface—no closer than 6 inches (15 cm).

Use a paintbrush to fill spots unreachable with a paint sprayer or roller. Areas by the doors, windows, and trim require a degree of precision that a paint sprayer and roller do not provide. Dip your brush into your paint bucket and gently apply your paint to these hard-to-reach areas. Apply your paint gently to avoid leaving brush marks.

Let the paint dry according to manufacturer's instructions. Read the instructions on the paint bucket to determine how long the paint needs to dry. Different paints require different drying times so be sure to check the label, especially if you are using a different paint than usual. In general, oil-based paints dry in 6 to 8 hours and a new coat can be applied in 24 hours. For latex paints, drying time is often about an hour and they are ready to recoat in 4 hours.

Add a second coat of paint if recommended by the manufacturer. Only apply a second coat if the manufacturer recommends it. Otherwise, stick with one coat and repaint your home only after it starts to fade or experience damage. As time goes by, use a paintbrush to paint small areas of fading paint or weather damage as needed.


Comments
0 comment