
- Measure your roof lengthwise from each end using a tape measure. Then, look for outdoor treated boards that are 2 in (5 cm) taller than the rafter ends.
- Then, use a circular saw to cut the boards to the length of your roof. Measure the angle of your roof, adjust your saw to this angle, then shave the top of each board.
- Place your boards on a miter saw and adjust the angle to 45 degrees. Then, cut 1 corner of each piece at a 45-degree angle.
Measuring and Cutting the Fascia

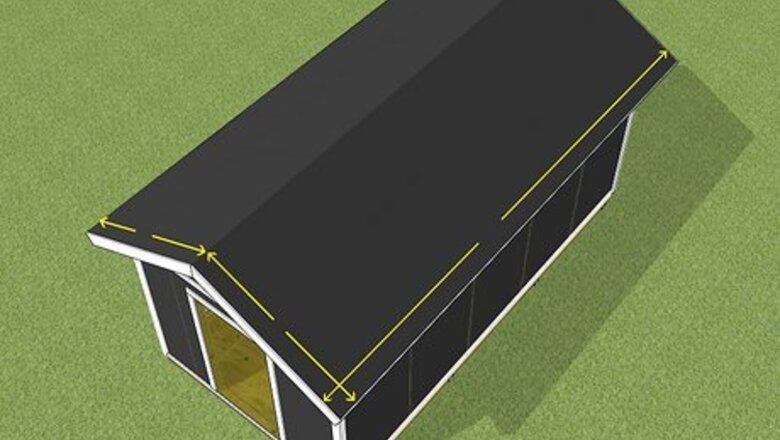
Use a tape measure to find the length of your roof. Climb a ladder near the corner of your roof and tape the end of your tape measure against the rafter using duct tape. Get off of your ladder and reposition it at the other end of your roof. Pull the tape measure along the length of your roof and climb up the ladder in the new position to take your measurement. Write down your measurement so you don’t forget it later on. Keep taking measurements for any other sections of your roof where you need to install fascia boards. If you’re replacing an old fascia board, you can measure the old board instead of your roof. Never stand on the top step of a ladder since you’ll be more likely to fall.
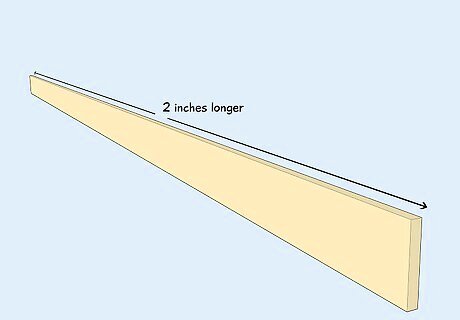
Get straight boards that are 2 in (5.1 cm) taller than the rafter ends. Look for boards that are treated for outdoor use since they’ll be more moisture-resistant and prevent rot from developing. Choose boards that are 1 inch (2.5 cm) thick so they fit easily onto the ends of your rafters. The ends of your rafters are usually either 6 or 8 inches (15 or 20 cm) tall, so boards that are 8 or 10 inches (20 or 25 cm) tall will work best. You can buy boards for your fascia from a hardware or home improvement store. Woods made from pine, spruce, or cedar all work well for fascia board. You may not be able to buy boards that are the exact length of your roof. If not, then get as many boards as you need to match the length.
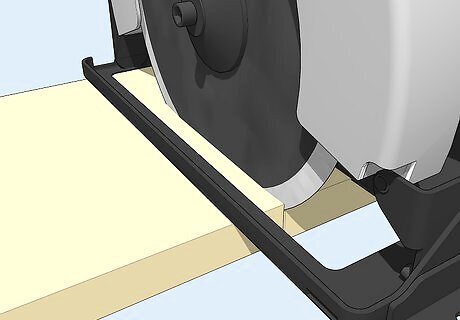
Cut the boards to length you need using a circular saw. Lay the board you’re cutting on top of 2 saw horses so the side your cutting hangs over the edge. Mark the line on your board so you know where to make your cut. Put on safety glasses before turning on the saw and pushing it through the board. Continue cutting the rest of the boards to the lengths you need. Ask the employees where you bought the boards to see if they can cut them for you if you don’t have the tools at home. You may also use a handsaw if you want, but it will take longer and may not be as precise as a table saw. Always keep your hands and fingers away from the saw blade, or else you could get seriously injured.Tip: If you can’t saw the boards to the exact length you need, then split the measurement between boards of equal length. For example, if you need 24 feet (7.3 m) of fascia board, you can cut 2 boards that are 12 feet (3.7 m) each or 3 boards that are 8 feet (2.4 m) each.

Rip the tops of the fascia boards to match the slope of your roof. Making the tops of your fascia boards the same angle as the roof allows you to easily place roofing material over them without creating bumps or ridges. Set the angle of the circular saw blade to match the slope of your roof, and run the saw along the top edge of each fascia board. Wear safety glasses while you’re working with your saw to keep your eyes and face protected. You don’t need to cut the top of the fascia board if you don’t want to, but it will give your home a clean appearance once you’re finished. Hold a speed square tightly against the side of your circular saw’s guide if you want to ensure you’re cutting a straight line.

Miter the ends of your fascia board to 45-degree angles so they fit together. Set the angle of a miter saw to 45 degrees so you can make clean cuts through the board. Put on your safety glasses, and position the fascia board so the corner on one end lines up with the saw blade. Turn the saw on and pull it down to cut the angle. Cut the ends of any other boards that will be on a corner. Make sure your hands aren’t in the path of the saw while you’re cutting so you don’t seriously injure yourself. Some hardware stores offer miter saw rentals so you can use one without purchasing it. You don’t need to miter the ends of the boards if you don’t want to, but the corners won’t look as clean. You only need to miter the ends of the fascia boards that are on corners.
Installing the Boards
Position the fascia board so it’s level with the top edges of the rafters. Ask a helper to assist you so you don’t have to lift the fascia board yourself. Climb your ladder so you can reach the ends of your rafters and hoist the board into place. Press the board tightly against the ends of the rafters so the top edge is level with the tops of the rafters. Have your helper hold up the other end of the board so it’s straight across the top. Don’t try to position the fascia boards alone since you could easily slip and fall off of the ladder while trying to support the board.Tip: Line up the boards so they end on a rafter so you can easily secure them without the risk of them coming loose.
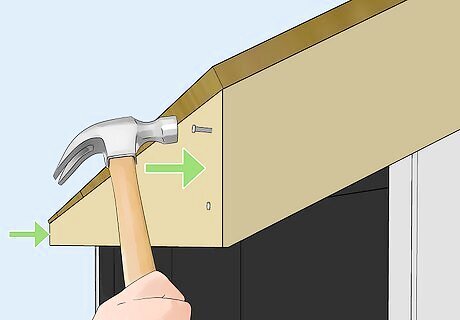
Tack the ends of the fascia board into the rafters with carpentry nails. Have your helper support the board so you’re able to nail the end into the rafter. Use carpentry nails that are at least 2–3 inches (5.1–7.6 cm) long so the board stays firmly in place. Start your first nail 1–2 inches (2.5–5.1 cm) from the top of the fascia board and pound it straight through into the end of the rafter. Repeat the process on the other end of the fascia board so it’s held firmly in place. Tacking the board on the ends first allows you to make sure everything stays level before you put in the other nails. You can also use 2 in (5.1 cm) wood screws and a drill to secure the board if you want.
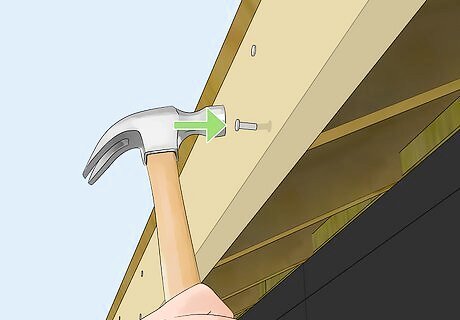
Drive 1–2 more nails into the fascia board at each of the rafters. Place the first nail in each rafter so they’re 1–2 inches (2.5–5.1 cm) from the top edge of the boards. Place the second nail in the rafter so it’s 3–4 inches (7.6–10.2 cm) lower than the first one so it’s held securely. Make sure you nail the fascia board into each rafter along the length, or else the board could start bowing and come loose. If you notice your fascia board bowing away from the rafter in the middle or on the bottom, add a third nail to secure it better.
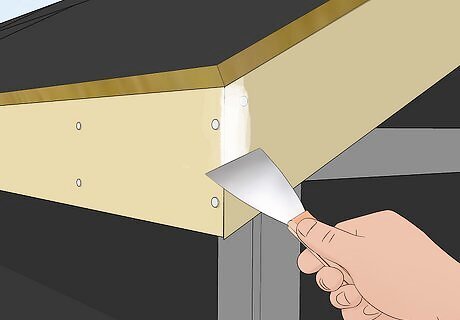
Seal the gaps and nail holes with body filler putty to lock out moisture. Once you have the fascia board in place, dip the end of a putty knife into body filler putty and apply a thin layer to the seams and nail holes. Push the putty into the cracks and holes with the blade of the knife to work it deeper so moisture can’t get inside. Scrape any excess putty off of the wood so it has a smooth finish. You can buy body filler putty from your local hardware store. You can also use caulk instead of body filler putty if you want.

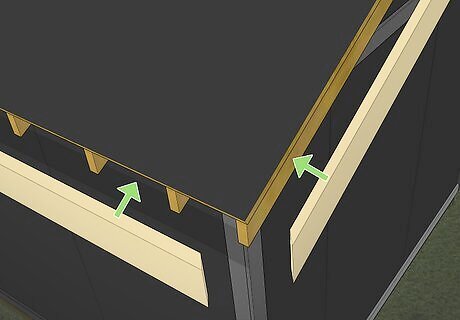
Cover the top of the fascia board with metal drip edges. Drip edges are angled metal pieces that cover the top edge of your fascia boards so moisture doesn’t get between them and the rafters. Place the drip edge on top of your rafter so the end extends over the top of the fascia board. Drive 2–3 nails along the top of the drip edge to secure it to the rafters underneath. Work across the length of your roof to install drip edges along the entire length. You can buy drip edges from your local hardware or home improvement store.


Comments
0 comment