
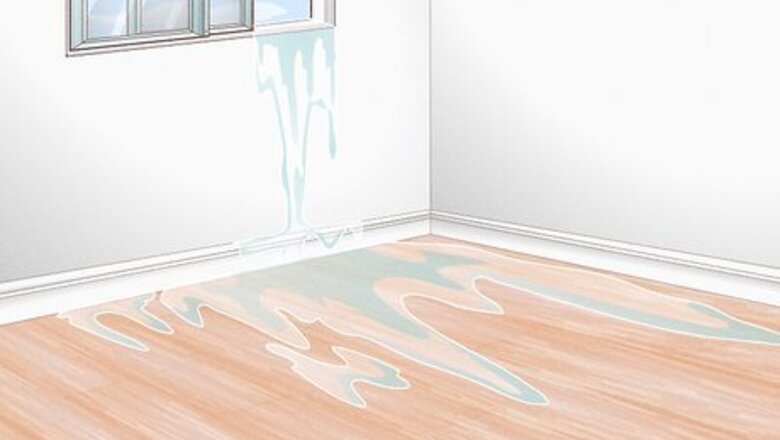
- Warping can be caused by exposure to moisture (from above or below), fluctuating or extreme humidity levels, or a lack of expansion gaps along walls.
- Adjust the humidity of the room—and any space below the room, such as a basement—to between 35%-50% to address minor warping due to humidity.
- Temporarily remove the baseboard and cut expansion gaps along the walls if this is the cause of mild warping.
- Cut out and replace moderate- to severely-warped bamboo planks—but only after resolving the cause of the problem in the first place.
Identifying Bamboo Flooring Problems

Excessive moisture exposure: Bamboo flooring can handle short-term exposure to surface moisture, but you should never allow water to just sit on the flooring. Wipe up things like water spills, wet shoe tracks, and pet accidents as soon as possible. If you mop the floor, wet it only as much as is necessary and dry it with a towel right afterward. Clean bamboo floors with a bucket of warm water and just a few drops of dish soap. Don’t use oil-based cleaners, like oil soaps, since these will cause residue buildup. You can, however, use a specialized bamboo cleaner if you want to make your floors shine. Leaky water pipes, drains, or supply lines (like the water supply line to your fridge’s ice maker) can quickly warp bamboo flooring. Check regularly for leaks and make immediate repairs as needed.
Inconsistent humidity levels: Like all hardwood floors, bamboo swells slightly in higher humidity and shrinks a little in lower humidity. If the room has high humidity, low humidity, or fluctuating humidity, or if the humidity levels above and below the bamboo are markedly different, warping is likely to occur. Cupping, when the edges of a bamboo plank curl upward, usually happens when there’s higher humidity under the floor than above it. Warping, when the center humps upward or becomes wavy, typically occurs when the opposite is true.

No expansion gaps along the walls: Even with perfect moisture and humidity conditions, bamboo flooring is going to expand and contract to some degree. Therefore, bamboo floors should be installed with at least a ⁄8 in (9.5 mm) expansion gap—basically, a bit of “room to grow”—along all walls and across doorways. To check for expansion gaps, use a pry bar to remove a section of the baseboard to expose the meeting point of the floor and wall. Expansion gaps are especially important for “floating” floors—that is, interlocking floor planks that aren’t attached to the subfloor with glue or nails. But any type of installed bamboo floor should have expansion gaps.
Low-quality flooring or installation: A lack of expansion gaps is a sure sign of substandard installation, but improper techniques like poor subfloor preparation can also contribute to ongoing warping. And, even with proper installation, lower-grade bamboo flooring planks can simply be more prone to warping regardless. In these cases, unfortunately, replacing the floor might be the most viable option. Replacing a hardwood floor (such as bamboo) is a potential DIY task, but hiring a trained and experienced professional to do the job may improve your odds of avoiding a repeat of the warping issue.
Balancing the Humidity
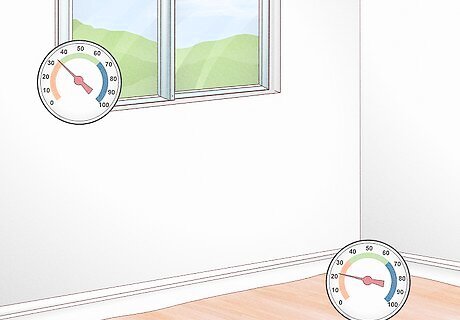
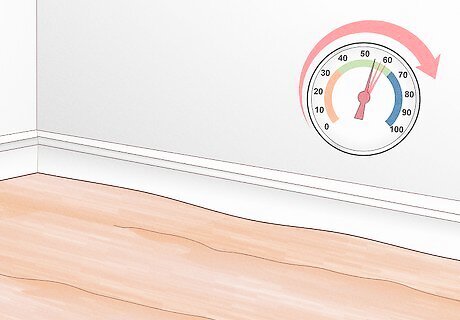
Compare the room’s humidity level to that of the space below it. Use a hygrometer (a humidity meter) to record the room’s humidity level multiple times over the course of a day. Do the same to any living space, basement, garage, or crawlspace directly beneath the room. If the humidity readings are consistent, are both in the range of between 35% and 50%, and are within less than 10% of each other (for instance, 43% and 38%), then another issue is probably causing your warping problem. The more exposed the underside of the bamboo flooring is to the space below it, the more impact that space’s humidity level will have. For instance, if the subfloor beneath your bamboo flooring is uninsulated and exposed to your basement, the higher humidity level in your basement can have a big effect.
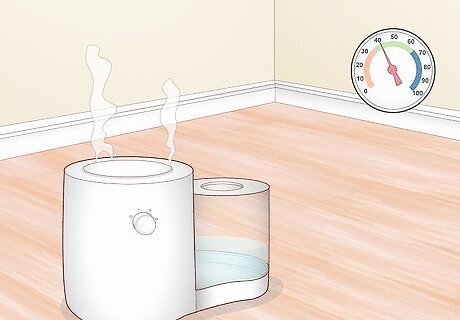
Use humidifiers and/or dehumidifiers to even out the humidity. Maintaining balanced humidity levels in the 35%-50% range may require interventions in multiple rooms. Opening windows or using fans can be short-term fixes in some cases, but aren’t really long-term solutions. Instead, you may need to run a dehumidifier to lower the humidity in the basement below the room and a humidifier to raise the humidity in the room itself.

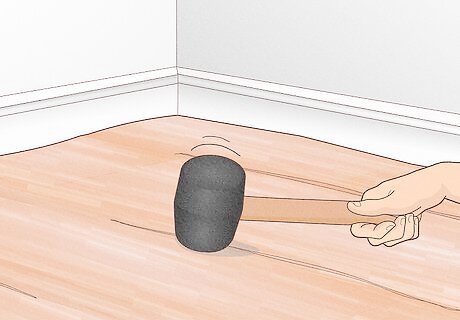
Weigh down the warped flooring while the humidity evens out. Adding some downward pressure to the top of the affected bamboo planks may help coax them back into a flattened shape. First, lay a towel down to protect the bamboo from scratching, then place something heavy like paint cans, bricks, or even a concrete block on top of the warped wood. With any luck, your warping will be a thing of the past!
Creating Expansion Gaps

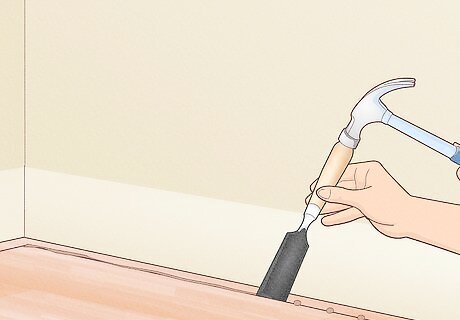
Remove the baseboard along all the walls in the room. Run the blade of a utility knife along the top of the baseboard to cut through any paint, caulk, etc. that connects the baseboard to the wall. Slide the hooked end of a pry bar between the top of the baseboard and the wall, then pull the pry bar straight away from the wall to separate the baseboard section-by-section. Work slowly and carefully if you want to preserve the baseboard and reinstall it.

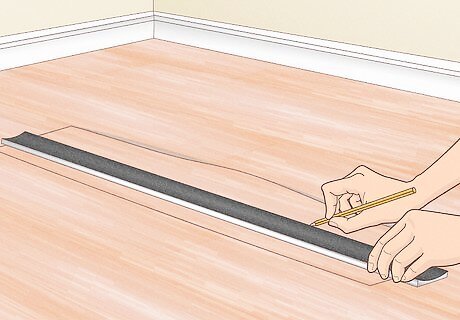
Mark a cut line at least ⁄8 in (9.5 mm) from the walls. Use a pencil and a straight edge or a chalk line to lay out the cut lines for the expansion gap. The recommended gap for bamboo flooring is typically 8-10 mm, which is roughly equivalent to 3/8 in. It’s okay to mark out a slightly larger expansion gap if you wish, so long as the baseboard you plan to install will cover it.
Drill and chisel (or cut) the flooring between the cut line and wall. Your cutting here should be relatively neat but doesn’t need to be perfect, since the baseboard will cover it. You have two options for cutting, depending on the tools you have available: Option 1: Use a power drill to make a series of side-by-side pilot holes through the bamboo flooring (but not through the subfloor) along the cut line. Then set the blade of a wood chisel on the line and tap it with a hammer to cut through the flooring. Repeat the process along the cut line. Option 2: Cut through the flooring (but not into the subfloor) with the blade of a power rotary tool (such as the brand Dremel).

Pry up the separated flooring to create the expansion gap. Use your pry bar, chisel, or a flat-head screwdriver to lift up the cut bamboo between the cut line and the wall. Discard these excess strips of flooring.
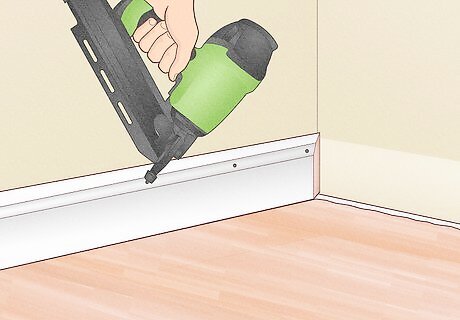
Replace the baseboard by securing it to the wall, not the floor. Use a hammer and finishing nails or, for a neater job, a finish nailer, to reattach the baseboard to the studs behind the finished wall. If the old baseboard isn’t wide enough to cover the expansion gap, install a new baseboard that is thicker or add quarter-round trim to the bottom of the old baseboard. Be sure not to attach the baseboard or any added trim pieces to the flooring itself. Otherwise, the bamboo won’t be able to expand and contract freely along the expansion gap.
Replacing Warped Bamboo Flooring
Mark a center line along the first (or only) plank you’re replacing. Draw the line lengthwise from end to end of the plank. The line doesn’t have to be perfectly centered or perfectly straight, but it’ll make the cutting process easier if you use a straight edge or chalk line.

Drill and chisel (or cut) along the marked center line. Since this cutting line doesn’t need to look pretty, using a power drill is perfectly fine here. Drill a series of holes deep into the bamboo plank (but not the subfloor below it) along the center line. After that, use a wood chisel and hammer to cut down through the plank along the line. Alternatively, cut through the plank along the line with a rotary tool or a circular saw. Just be careful not to cut down through the subfloor, especially in the case of the circular saw.
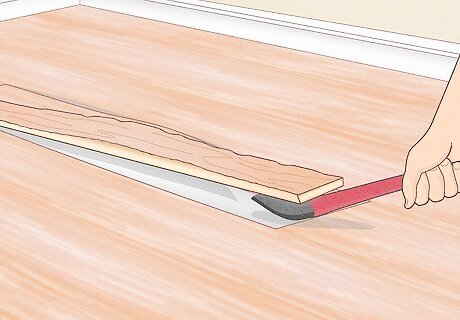
Pry up the cut plank and any warped surrounding planks. Wedge the blade of your pry bar (or chisel or flat screwdriver) into the cut in the center of the plank, then lift the pieces of the damaged plank up and out of place. If there are other warped planks surrounding this first one, pry under the edge of each one to lift them out as well.

Cut matching, room-acclimated replacement plank(s) to length. Measure the opening carefully to get the precise length measurement for the replacement plank or planks. For the best match, use extra planks left over from the original installation or “borrow” some installed planks from a concealed spot like in a closet or under a kitchen appliance. To “borrow” planks from under an oven, for instance, sacrifice one plank by cutting it out, then carefully pry up the others you need. Replace the removed planks with strips of a cheaper material like plywood. Cut the replacement planks to length with a circular saw. If the replacement planks weren’t already installed in the room, leave them to acclimate to the humidity conditions in the room for 72 hours before installing them.
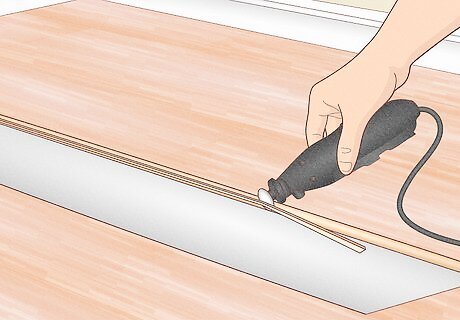
Cut off the bottom “lip” on the grooved side of the plank(s), if needed. Bamboo flooring planks usually interlock with tongue-and-groove ridges along the long sides of each plank. To nestle a replacement plank in place, you’ll have to remove the bottom “lip” (protrusion) on the “groove” side. The cutting blade on a rotary tool (like the brand Dremel) is probably your easiest option here. Secure the plank upside-down and use your cutting tool to carefully remove the lower lip without damaging the upper one.
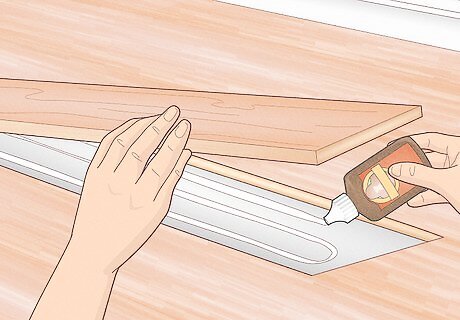
Glue and/or nail the replacement plank(s) in place. If you’re using nails, start by setting the new plank into position: slide its tongue side into the groove of the installed plank next to it, then push it down onto the subfloor. Use your hammer to drive nails through the plank and into the subfloor, setting the head of each nail slightly below the bamboo surface (this is called countersinking). Fill in the exposed nail heads later with color-matched wood putty. If you prefer to use glue, apply a zig-zag bead of construction adhesive to the bottom of the plank, slip the plank’s tongue into the groove of the adjacent installed plank, then press down firmly to set the plank in place.


Comments
0 comment