
Update to the latest version of Windows 7.
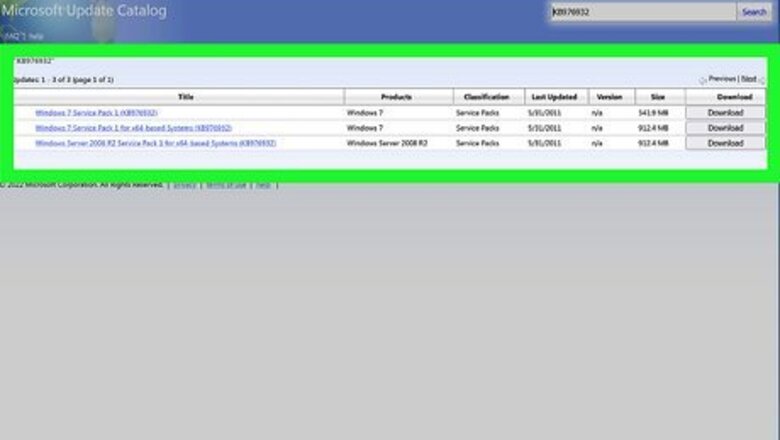
Microsoft has discontinued support for Windows 7. However, you can still download the latest service pack for Windows 7, which may help your system work better overall. The last service pack for Windows 7 is SP1. You can download it here: https://www.catalog.update.microsoft.com/Search.aspx?q=KB976932 Because Microsoft no longer supports Windows 7, you won’t be able to get any new security updates. This means your computer will be more vulnerable to malware, viruses, and other issues that could slow down your internet speed.
Run the Network and Internet troubleshooter.
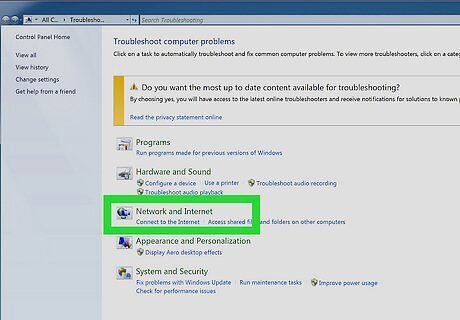
This built-in tool can sometimes identify and fix connection issues. To use it, click the Windows 7 Start Start button in the lower-left corner of your computer screen, then open the Control Panel. Type troubleshooter into the search box and select Troubleshooting from the search results. Then, under the Network and Internet heading, select Connect to the Internet. The troubleshooter will run a scan to try to identify any problems with your internet connection. Follow the prompts to fix any issues that the scan discovers.
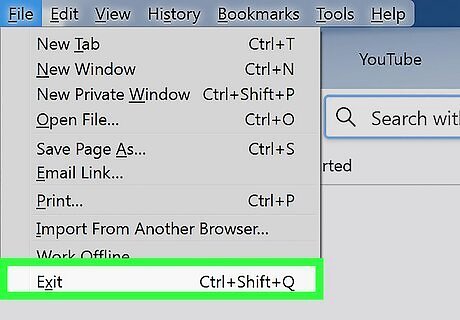
Choose a high-speed browser.

Google Chrome and Microsoft Edge are good options. The browser you use can have an impact on how well your internet connection works. Speed tests of Microsoft-compatible browsers show that Google Chrome and Microsoft Edge tend to run faster than the competition. Internet Explorer has a reputation for being slow, and Microsoft has recently discontinued support for it. If you’re still using Internet Explorer, consider switching to a different browser.
Clear your browser cache and cookies.
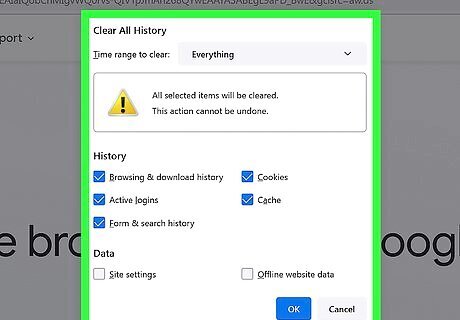
Too much junk in your cache can cause internet performance issues. The right way to clear your cache depends on which browser you’re using. However, with most Windows-compatible browsers, you can quickly clear the cache and cookies using the keyboard shortcut Ctrl+⇧ Shift+Delete. Once you’ve cleared the cache, close your browser and restart it to make sure the changes take effect. You can also delete the cache of temporary internet files from your computer in Windows 7 using the Control Panel. To do this: Click the Windows 7 Start Start button, then open the Control Panel. Select Network and Internet, then Internet Options. Open the General tab and click Delete under Browsing history. Select Delete all, then click Yes. Click OK to confirm your choice.
Remove unneeded browser add-ons.
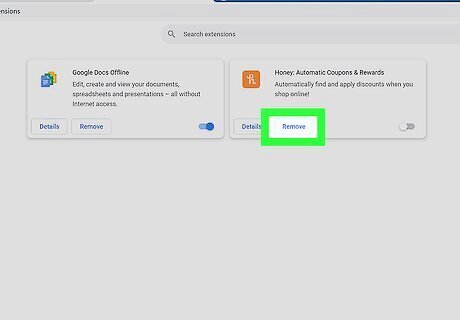
Too many browser add-ons can slow down your internet speed. If you think add-ons might be the culprit, try disabling all your extensions, plug-ins, and other add-ons and see if it makes a difference. If so, it might be a good idea to reset your browser to its original settings. You can also try reinstalling or re-enabling your add-ons one by one to try to identify the specific source of the problem.
Check your computer for malware and viruses.
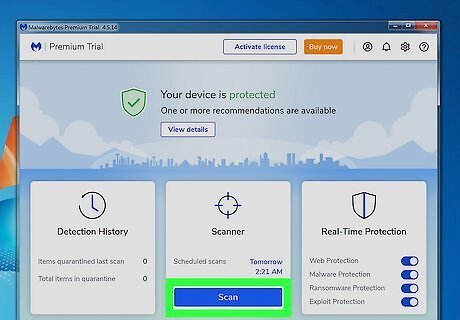
This is especially important since Windows 7 is no longer supported. Adware, malware, and viruses can slow down your computer’s overall performance and reduce internet speeds, as well as putting your personal information at risk. Since there are no longer any new security updates for Windows 7, don’t rely on scanning your computer with Windows Defender. Instead, use a third-party security app that’s up-to-date. Some antivirus apps that may still offer Windows 7 support include Avast, AhnLab, Kaspersky, AVG, and NortonLifeLock. However, it’s not clear how long this support will last, so check the developer’s website to be sure.
Close apps that use a lot of bandwidth.
You can monitor network usage using the Task Manager. To launch Task Manager, hit Ctrl+⇧ Shift+Esc on your keyboard. Once it opens, click the Networking tab to see a list of processes or apps that are using up lots of bandwidth. If you notice an app or process that’s eating up lots of network resources, try closing it and see if that boosts your internet speed. You can also monitor network activity in more detail using the built-in Resource Monitor in Windows 7. To launch it, open the Start menu and select the Accessories folder, then open the System Tools folder. From there, open Resource Monitor. There are also a few third-party network resource monitors on the market, such as Process Explorer, Process Monitor, and Glances.
Minimize network traffic from other devices.

Downloads, streaming, and other activities can slow down your network. If you share your network with other users or devices, find out if traffic on the network is causing problems. For example, if someone is using a streaming service or downloading a large file, this could slow down your connection. Try connecting to a different network if one is available, or hop online at a time when there isn’t as much traffic.
Troubleshoot your router or modem.
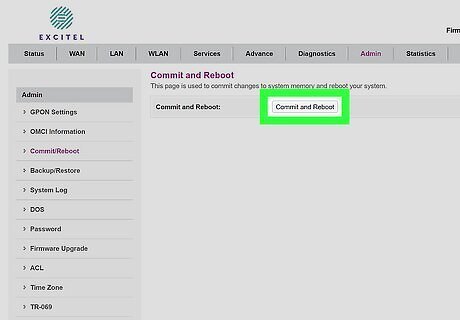
Rebooting your router or modem can help. It’s also a good idea to make sure your modem or router’s firmware is up-to-date. If all else fails, try resetting your router to its factory settings. You can usually do this by pressing and holding a small reset button on the rear panel of the router, but check your user manual for instructions. You can also call your internet service provider to get help troubleshooting issues with your networking hardware. If you’re using an older modem or router, it might be time to upgrade to a new one.
Install a DNS benchmark application.
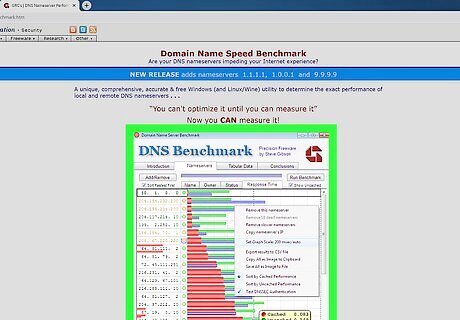
Problems with your Domain Name System (DNS) server can slow things down. When you browse the web, your computer uses a DNS server to quickly look up a website’s IP address. However, these servers don’t always work as efficiently as they should. DNS benchmark utilities can help you find and connect to the fastest available DNS server. Try downloading a DNS tool such as GRC, NameBench, or DNS Jumper.
Limit reservable bandwidth on your computer.
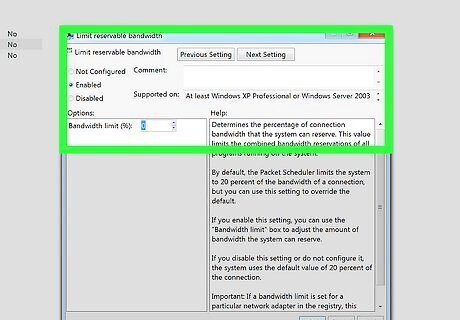
Reservable bandwidth prioritizes system-related processes. This includes things like major security updates. Since there will no longer be new updates for Windows 7, this is less of a problem than it used to be. However, you might still find it worthwhile to change this setting and see if it helps. To limit reservable bandwidth on your computer: Click the Windows 7 Start Start button and type gpedit.msc into the search bar. Click on gpedit.msc in the list of search results. Select Computer Configuration under Local Computer Policy in the menu bar on the left. Open the Administrative Templates folder, then select Network. Click the QOS Packet Scheduler folder. In the main window, select Limit Reservable Bandwidth. A new window will open up displaying Limit Reservable Bandwidth Properties. Click Enabled and type 0% in the Bandwidth Limit tab. Click OK.


Comments
0 comment