views
X
Research source
They're also a nice alternative to nylon halters, because they are easy to fix and much more lightweight. It's important to tie a rope halter correctly, though, or your horse will easily slip right out of his halter.
Preparing the Rope
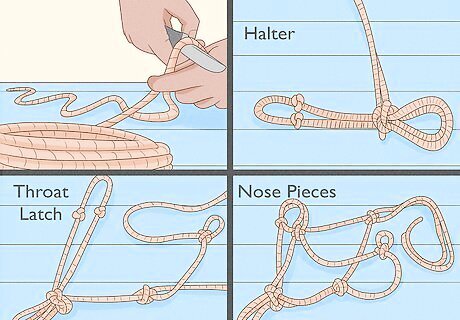
Select a rope. There are many different types of rope available, and which type you use will depend on your preferences as well as your budget. Some experts recommend using an all-cotton rope for tying halters, as this material will be easier on your hands and on your horse's skin. Rope is available at most hardware stores, as well as many horse equipment retailers. Ropes made of synthetic materials tend to "burn" skin when dragged across the skin or through a clenched hand. For tying a horse halter, choose a rope that is between 1/2 inch to 9/16 inch in diameter.
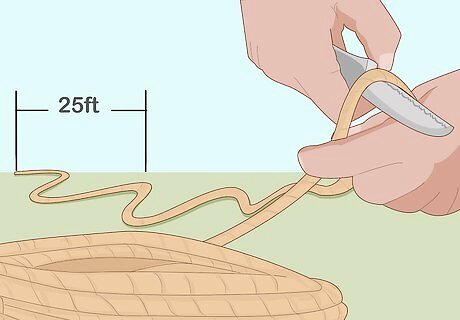
Cut it to length. If you are new to tying rope halters, you will want to give yourself more length to work with. Some experts recommend starting with a rope that's between 22 and 25 feet in length. As you gain experience and get more proficient with tying halters, however, you may be able to decrease your length of rope as short as 13 to 16 feet in length. Place the rope on a firm wooden block to cut or chop it to length. Use a sharp knife or axe to cut the rope to whatever length you desire. A dull blade could cause frayed ends, which can weaken the strength of your rope.
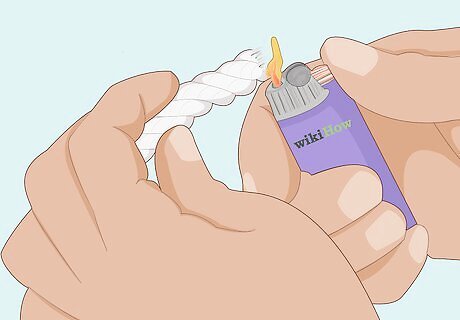
Secure the ends. Even if you used a sharp blade to cut the rope, there's still a chance the ends could fray and come undone, which would weaken your rope and compromise the halter you're creating. That's why it's imperative that you secure the ends. You can do this by a number of methods: melt the ends of the rope over an open flame use a soldering iron to fuse the ends of the rope use a combination of soldering the ends and wrapping them in parachute cord wrap the rope with friction tape, applying two to three turns around the rope approximately 1/2 inch from the ends.
Starting the Halter
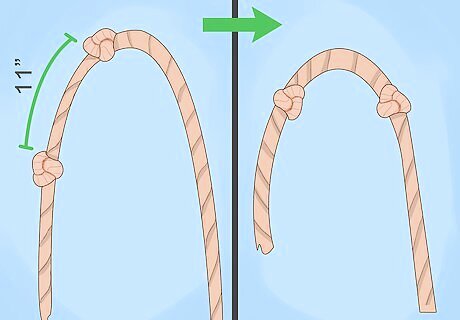
Tie two central knots. To begin with, lay your rope flat on the ground or on a table. Fold the rope in half so you can easily gauge the middle of the rope. Tie a simple, overhand-style knot at the center, and make sure it is snug. Then move your hands 11 inches to the left of the knot and tie a second overhand knot. When you've got two knots, adjust your hold on the rope so that the entire rope is folded in two at the direct center of the two knots you've just tied. These knots will later become the noseband knots that hold the halter around your horse's face.
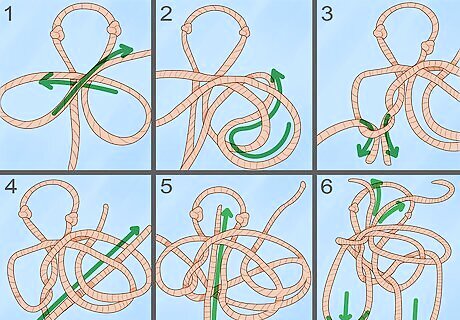
Fold and cross the rope. Keeping the rope folded together, move your hands down the rope. Grab a paired section so that you have both strands of the rope and cross them over the rest of the rope approximately seven inches from the center (between the two overhand knots). If looking at the rope flat on a table, the rope should come straight down from the center of the two knots, curve around over on itself (with the paired section off to the left of the rope, laid across the main strand), and taper back off to the right, forming what looks vaguely like a plus sign.
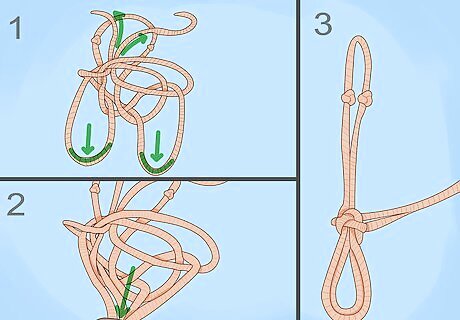
Pull the loop through. With the paired strand forming a small loop still off to the left over the main strand, pull that loop down, under/behind the main strand, and up through the second loop that was formed at the bottom (the lower "leg" of the plus sign). The knot will be similar to a tied shoelace. Pull that knot tight, and you have a simple alternative to the fiador knot. Double check that the overhand knots from step one are still seven inches from the alternative fiador knot you've tied. Adjust the loops until they each measure approximately 2.5 inches in length. Once everything is spaced and arranged as it needs to be, tighten the knots as needed.
Making the Throat Latch
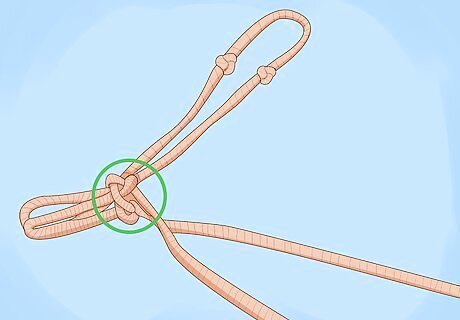
Form the throat latch. Keeping the rope flat on the table, extend the two un-knotted ends of the rope off to the right of the alternative fiador knot. Take the "bottom" strand (farthest from you) and tie a simple overhand knot on this strand, approximately six to seven inches away from the loops. Then feed the other strand through the knot, but do not tighten it yet.
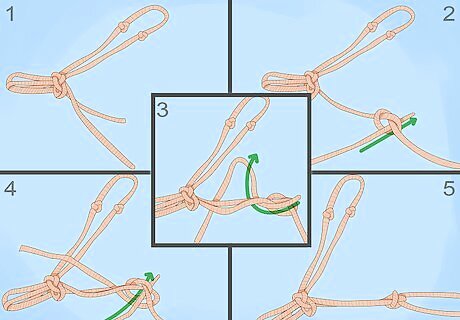
Make a knot. With the loose strand through the un-tightened knot, pull the rope up, over, and back underneath the rope between your overhand knot and the alternative fiador knot. Pull the rope out to its end and then feed it back through the center of the knot. Pull both strands to tighten the knot. You should now have a double-stranded "arm: of rope between the alternative fiador knot and the overhand knot you've just tied. Make sure the distance between the alternative fiador knot and the overhand knot is still between six and seven inches. Adjust as necessary before tightening the overhand knot into place.
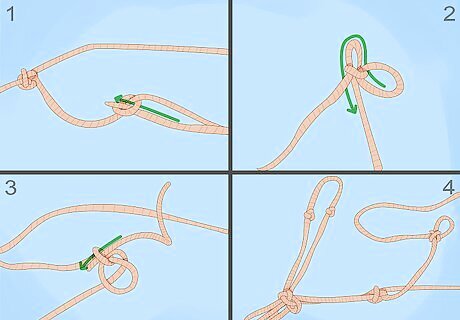
Tie a loop. Take the strand of rope closest to you (on top, if looking down at the rope on a table) and form a simple overhand knot approximately 9 to 10 inches from the previous overhand knot. Before you tighten that knot, take the end of that rope and tie a loop knot. Feed the end of the strand you're working with through the overhand knot you've just formed. Pull it through the knot until you're left with a small loop approximately two inches in length. Using the same strand of rope, feed the strand up and over the overhand knot you've formed, then bring it back down under the knot. Feed the strand through the center of the loop and back through the knot. Pull on the loop and the end of the strand simultaneously to tighten the knot. Double check the length of the rope between the two knots. It should measure approximately 9 to 10 inches in length.
Tying the Cheek and Nose Pieces
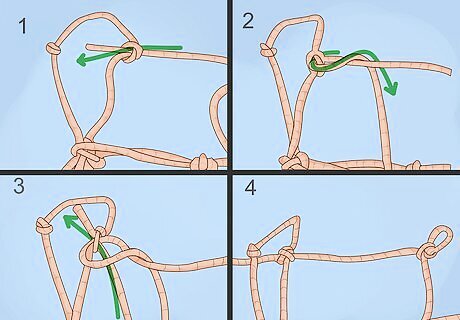
Form the left cheek piece. The cheek piece should measure approximately 11 inches in length between the loop knot you've just formed to the noseband knot you formed at the original center of the rope. Start by loosening the central knot (noseband knot) closest to you and feeding the strand you've been working with through the middle of that knot. This strand will be the left cheek piece. Before you tighten the knot, cross the strand over and then under/behind the cheek piece. This should form a loose overhand knot. Then feed the strand back through the middle and tighten the knot. There should now essentially be a second knot directly against the noseband knot you're working with (also called a double-overhand knot).
Tie the noseband. Begin by loosening the other noseband knot. Take the strand of rope you're working with and feed it through the center of the noseband knot, forming another double-overhand knot. Pull the strand of rope through the center and over the top of the two arches (between the two noseband knots). Feed the strand under and through the access. Then feed the strand through the loop you've just formed and continue through the center of the first simple overhand knot. Adjust the knots as needed to balance the alternate fiador knot and the noseband piece. When everything is in place, tighten the knots.
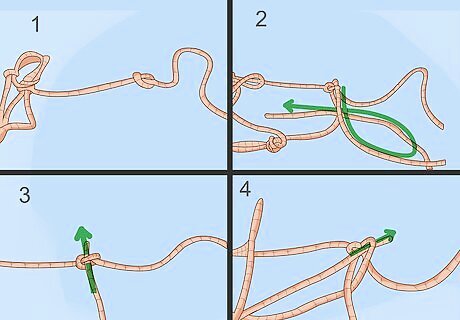
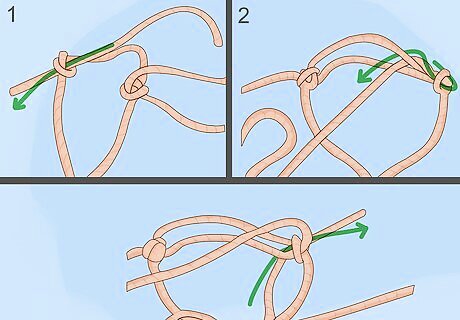
Create the right cheek piece. This cheek piece should be approximately 11 inches in length, just like the left cheek piece. Start by forming a simple overhand knot with the strand you're working with. Take the other strand and feed it up through the center of the overhand knot. Then go up, over, and then underneath the loop you've just formed. Then put the end of that strand through the center of the overhand knot. Pull the strands on both ends of the knot to tighten it.
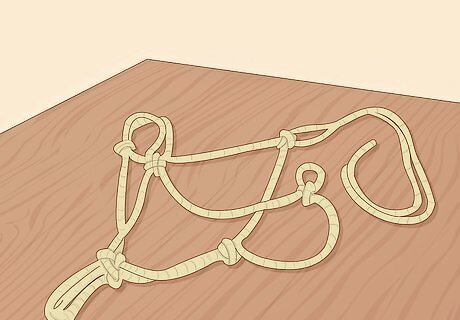
Finalize the halter. Measure both strands of the halter to 27 inches. Cut off any excess rope in the same manner that you cut the rope at the beginning (a sharp blade on a wooden block), and secure the ends in the same way you did after cutting the rope to size. You now have a completed rope halter.
Haltering your Animal
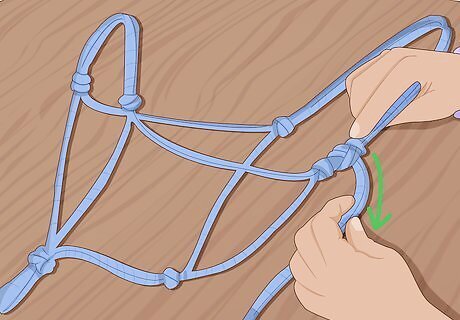
Adjust the head stall. Size up the size of your horse or cow's head, and adjust the head stall as needed. Be sure to allow some slack in the chin strap. Hold the halter lead and the loop splice in your left hand and the head stall in your right hand.
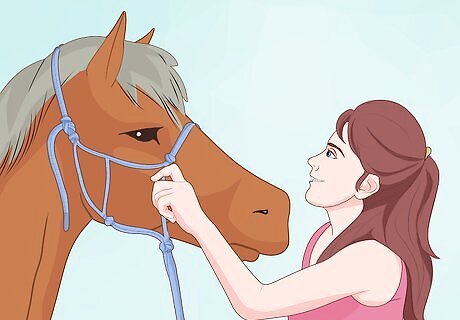
Approach the animal carefully. Choose an appropriate place to halter your animal. It's best if you do this away from other animals and away from any food sources so the animal does not become excited or distracted. Approach from the animal's left side and slide the nose piece over the animal's nose. Keep the chin strap underneath the animal's chin, and put the head stall over the top of the animal's head, behind the ears. Use caution when approaching any animal, especially if it's an animal you're not familiar with (and who isn't familiar with you).
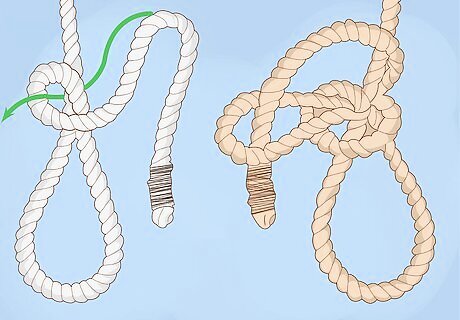
Secure with a quick-release knot. If you need to tie your animal to a post, use a quick-release knot. It's similar to a slip knot, but can be untied more quickly and easily in case of an emergency. Take the end of the lead in your hand and form a loop. Make a second, smaller loop to the left of where the first loop is formed, and lay it off to the right. Form a third loop and feed it through the second, smaller loop. Tighten the loop to form a knot.


Comments
0 comment