

Getting the Grade

Attend every class. Class is a time to learn new things and solidify the information that you may have learned in the previous class. If you don’t go to class, it is much more difficult to stay current with the material. Ask questions in class. Your teacher is there to make sure you have a solid grasp on the material. After the lesson you should not feel confused or lost, but be able to explain in your own words any concept that you learned. So if you have a question, don’t hesitate to ask it. Some of the other students in the class likely have the same question. Prepare for class by reading the lesson you are going to cover ahead of time and know the formulas, theorems, and postulates by heart. Pay attention to your teacher while you are in class and work promptly on class assignments. You can talk to your classmates at break or after school.

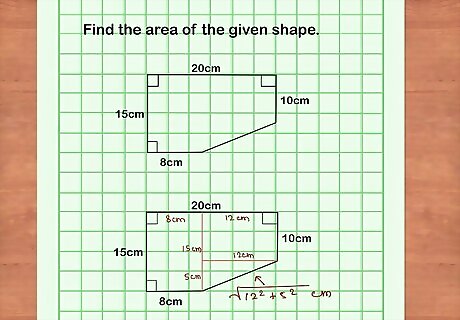
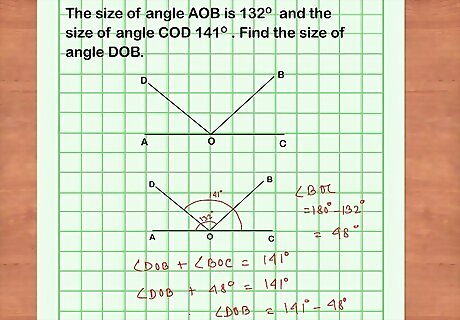
Draw diagrams. Geometry is the math of shapes and angles. To understand geometry, it is easier to visualize the problem and then draw a diagram. If you're asked about some angles, draw them. Relationships like vertical angles are much easier to see in a diagram; if one isn't provided, draw it yourself. Understanding the properties of shapes and visualizing them is essential to succeeding in geometry. Practice recognizing shapes in various orientations and based on their geometric properties (the measure of angles, number of parallel and perpendicular lines, etc.).

Form a study group. Study groups are a good way to learn the material and clarify concepts you don’t understand. Having a group that meets on a regular schedule will also force you to stay on top of the material and try your best to comprehend it. Studying with classmates is useful when you come to more difficult topics. You can work through them together to figure them out. One of your study mates may understand something that you don’t and help you out with it. You might also be able to help them understand something and learn it better by teaching them.

Know how to use a protractor. A protractor is a semicircle-shaped tool used to measure the degree of an angle. It can also be used to draw angles. Knowing how to properly use a protractor is an essential skill in geometry. To measure the degree of an angle: Align the center hole of the protractor over the vertex (center point) of the angle. Rotate the protractor until the baseline is on top of one leg of the angle. Extend the angle up to the arc of the protractor and record the degree it falls upon. This is the measurement of the angle.

Do all of the assigned homework. Homework is assigned because it helps you learn all of the concepts in the material. Doing the homework teaches you what you really understand and what topics you might need to put more time into. If you come across a topic in your homework that you are struggling with, focus on that topic until you understand it. Ask you classmates or your teacher to help you out.

Teach the material. When you have a firm understanding of a topic or concept, you should be able to teach it to someone else.The ability to explain a concept to a friend or family member is usually a good indicator of your level of understanding. If you can’t explain it to them so that they also understand, you likely don’t get it as well as you thought either. Teaching material to others is also a good way to enhance your own memory or recall of the topic. Try teaching your sibling or parent some geometry. Take the lead in a study group to explain something you know really well.

Do lots of practice problems. As with any math course, time spent practicing is the best way to improve your Geometry skills. Another important thing to realize is that in Geometry,each new concept usually builds on the previous one so you want to make sure you are always up to speed. As for studying for the course, make sure to do your problems neatly on paper or digitally. Since it's such a visual course, it's very important to develop the habit of showing all your work, it will really help you down the line. In addition, make sure you have plenty of practice problems and answer keys to help you along the way. Make sure to do as many practice problems as you can from other sources. Similar problems may be worded in a different way that might make more sense to you. The more problems you solve, the easier it will be to solve them in the future.

Seek extra help. Sometimes going to class and talking to your teacher just isn’t enough. You might need to find a tutor who has more time to focus specifically on what you are struggling with. Working with someone one-on-one can be very useful in understanding difficult material. Ask your teacher if there are tutors available through the school. Attend any extra tutoring sessions held by your teacher and ask your questions.
Learning the Concepts of Geometry
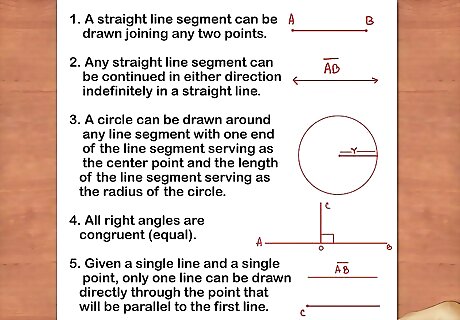
Know Euclid’s five postulates of geometry. Geometry is founded upon the basis of five postulates put together by the ancient mathematician, Euclid. Knowing and understanding these five statements will help you understand many of the concepts in geometry. 1: A straight line segment can be drawn joining any two points. 2: Any straight line segment can be continued in either direction indefinitely in a straight line. 3. A circle can be drawn around any line segment with one end of the line segment serving as the center point and the length of the line segment serving as the radius of the circle. 4. All right angles are congruent (equal). 5. Given a single line and a single point, only one line can be drawn directly through the point that will be parallel to the first line.

Recognize the symbols used in geometry problems. When you first start learning geometry, the various symbols can seem overwhelming. Learning what each of them means and being able to immediately recognize them will make things easier. Here are some of the most common geometry symbols you will come across: A small triangle refers to the properties of a triangle. A small angle shape refers to the properties of an angle. Letters with a line over them refer to the properties of a line segment. Letters with a line over them with arrows at each end refer to the properties of a line. One horizontal line with a vertical line in the middle means that two lines are perpendicular to each other. Two vertical lines mean two lines are parallel to each other. An equal sign with a squiggly line on top means that two shapes are congruent. A squiggly line means that two shapes are similar. Three dots forming a triangle means “therefore”.

Understand the properties of lines. A line is straight and extends infinitely in both directions. Lines are drawn with an arrow at the end to indicate that they continue on. A line segment has a beginning and an end point. Another form of a line is called a ray: it only extends infinitely in one direction. Lines can be parallel, perpendicular, or intersecting. When two lines are parallel they never intersect with each other. Perpendicular lines are two lines that form a 90° angle. Intersecting lines are two lines that cross each other. Intersecting lines can be perpendicular, but can never be parallel.

Know the different types of angles. There are three different types of angles: obtuse, acute, and right. An obtuse angle is one that measures greater than 90°, an acute angle is one that measures less than 90°, and a right angle is one that measures exactly 90°. Being able to identify angles is an important part of geometry. A 90° angle is also a perpendicular angle: the lines make a perfect corner.
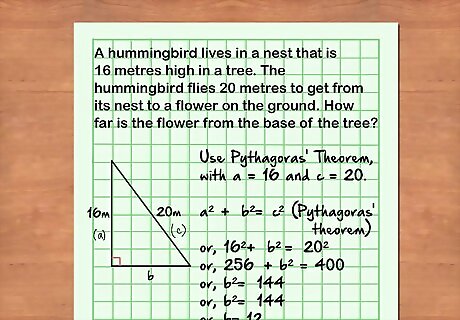
Understand the Pythagorean Theorem. The Pythagorean Theorem states that a + b = c. It is the formula that allows you to calculate the length of the side of a right triangle if you know the lengths of the other two sides. A right triangle is a triangle with one 90° angle. In the theorem, a and b are the opposite and adjacent (straight) sides of the triangle, while c is the hypotenuse (angled line) of the triangle. For example: Find the length of the hypotenuse of a right triangle with side a = 2 and b =3. a + b = c 2 + 3 = c 4 + 9 = c 13 = c c = √13 c = 3.6 EXPERT TIP Joseph Meyer Joseph Meyer Math Teacher Joseph Meyer is a High School Math Teacher based in Pittsburgh, Pennsylvania. He is an educator at City Charter High School, where he has been teaching for over 7 years. Joseph is also the founder of Sandbox Math, an online learning community dedicated to helping students succeed in Algebra. His site is set apart by its focus on fostering genuine comprehension through step-by-step understanding (instead of just getting the correct final answer), enabling learners to identify and overcome misunderstandings and confidently take on any test they face. He received his MA in Physics from Case Western Reserve University and his BA in Physics from Baldwin Wallace University. Joseph Meyer Joseph Meyer Math Teacher Use this visual trick to understand the Pythagorean Theorem. Imagine a right triangle with squares constructed on each leg and the hypotenuse. by rearranging the smaller squares within the larger square, the areas of the smaller squares (a² and b²) will add up visually to the area of the larger square (c²).

Be able to identify the types of triangles. There are three different types of triangles: scalene, isosceles, and equilateral. A scalene triangle has no congruent (identical) sides and no congruent angles. An isosceles triangle has, at least, two congruent sides and two congruent angles. An equilateral triangle has three identical sides and three identical angles. Knowing these types of triangles helps you identify properties and postulates associated with them. Remember, that an equilateral triangle is technically also an isosceles triangle, because it does have two congruent sides. All equilateral triangles are isosceles, but not all isosceles triangles are equilateral. Triangles can also be classified by their angles: acute, right, and obtuse. Acute triangles have angles that are all less than 90°; right triangles have one 90° angle; obtuse triangles have one angle that is greater than 90°.
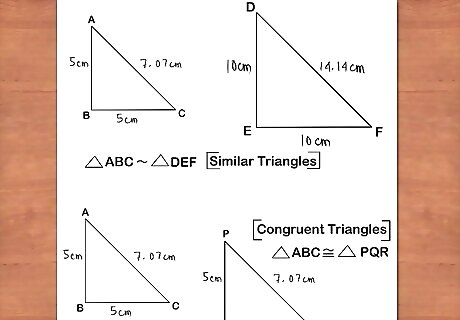
Know the difference between similar and congruent shapes. Similar shapes are those that have identical corresponding angles and corresponding sides that are proportionally smaller or larger than each other. In other words, the polygon will have the same angles, but different side lengths. Congruent shapes are identical; they are the same shape and size. Corresponding angles are identical angles in two shapes. In a right triangle, the 90-degree angles in both triangles are corresponding. The shapes do not have to be the same size for their angles to be corresponding.
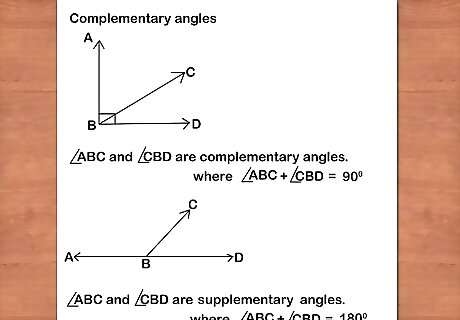
Learn about complementary and supplementary angles. Complementary angles are those angles which add together to make 90 degrees and supplementary angles add to 180 degrees. Remember that vertical angles are always congruent; similarly, alternate interior and alternate exterior angles are also always congruent. Right angles are 90 degrees, while straight angles are 180. Vertical angles are the two angles formed by two intersecting lines that are directly opposite each other. Alternate interior angles are formed when two lines intersect a third line. They are on opposite sides of the line they both intersect, but on the inside of each individual line. Alternate exterior angles are also formed when two lines intersect a third line; they are on opposite sides of the line they both intersect, but on the outside of each individual line.
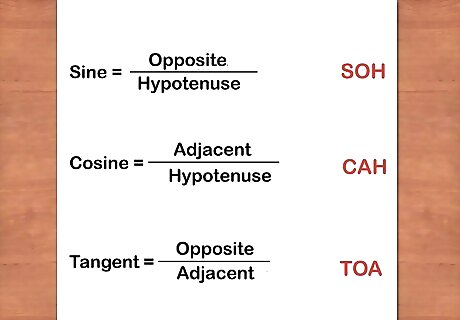
Remember SOHCAHTOA. SOHCAHTOA is a mnemonic device used to remember the formulas for sine, cosine, and tangent in a right triangle. When you want to find the sine, cosine, or tangent of an angle, you use the following formulas: Sine = Opposite/Hypotenuse, Cosine = Adjacent/Hypotenuse, and Tangent = Opposite/Adjacent. For example: Find the sine, cosine, and tangent of the 39° angle of a right triangle with side AB = 3, BC = 5 and AC = 4. sin(39°) = opposite/hypotenuse = 3/5 = 0.6 cos(39°) = adjacent/hypotenuse = 4/5 = 0.8 tan(39°) = opposite/adjacent = 3/4 = 0.75
Writing a 2-Column Proof
Draw a diagram after reading the problem. Sometimes the problem will be provided without an image and you will have to diagram it yourself to visualize the proof. Once you have a rough sketch that matches the givens in a problem, you might need to re-draw the diagram so that you can read everything clearly and the angles are approximately correct. Make sure to label everything very clearly based on the information provided. The clearer your diagram, the easier it will be to think through the proof.
Make some observations about your diagram. Label right angles and equal lengths. If lines are parallel to each other, mark that down as well. If the problem does not explicitly state two lines are equal, can you prove that they are? Make sure you can prove all of your assumptions. Write down the relationships between various lines and angles that you can conclude based on your diagram and assumptions. Write down the givens in the problem. In any geometric proof, there is some information that is given by the problem. Writing them down first can help you think through the process needed for the proof.

Work the proof backwards. When you are proving something in geometry, you are given some statements about the shapes and angles, then asked to prove why these statements are true. Sometimes the easiest way to do this is to start with the end of the problem. How does the problem come to that conclusion? Are there a few obvious steps that must be proved to make this work?
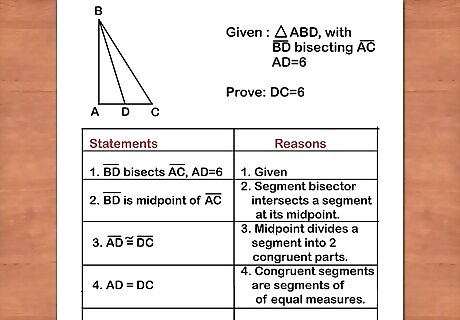
Make a 2-column grid labeled with statements and reasons. In order to make a solid proof, you have to make a statement and then give the geometric reason that proves the truth of that statement. Underneath the statement column, you will write a statement such as angle ABC = angle DEF. Under the reason, you will write the proof for this. If it is given, simply write given, otherwise, write the theorem that proves it.
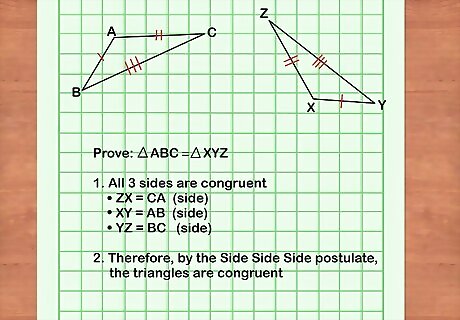
Determine which theorems apply to your proof. There are many individual theorems in geometry that can be used for your proof. There are many properties of triangles, intersecting and parallel lines, and circles that are the basis for these theorems. Determine what geometric shapes you are working with and find the ones that apply to your proof. Reference previous proofs to see if there are similarities. There are too many theorems to list, but here are a few of the most important ones for triangles: CPCTC: corresponding parts of the congruent triangle are congruent SSS: side-side-side: if three sides of one triangle are congruent to three sides of a second triangle, then the triangles are congruent SAS: side-angle-side: if two triangles have a congruent side-angle-side, then the two triangles are congruent ASA: angle-side-angle: if two triangles have a congruent angle-side-angle, then the two triangles are congruent AAA: angle-angle-angle: triangles with congruent angles are similar, but not necessarily congruent

Make sure your steps flow in a logical fashion. Write down a quick sketch of your proof outline. Write down the reasons for each step. Add the given statements where they belong, not just all at once in the beginning. Re-order the steps if necessary. The more proofs you do, the easier it will be to order the steps properly.

Write down the conclusion as the last line. The final step should complete your proof, but it still needs a reason to justify it. When you have finished the proof, look it over and make sure there are no gaps in your reasoning. Once you have determined that the proof is sound, write QED at the bottom right corner to signify it is complete.


Comments
0 comment