

Woven Candy Stripe Friendship Bracelet
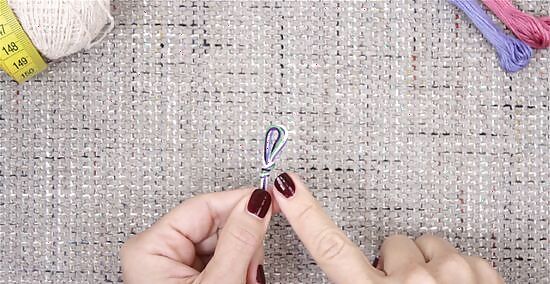
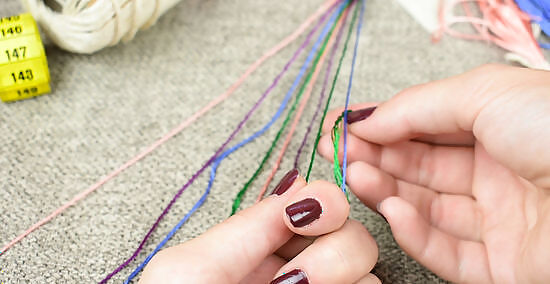
Cut four 1 m (39 in) strands of embroidery floss, fold them in half, and tie a loop. For this tutorial, we’ll use 4 floss colors—pick whichever colors you like or follow our example using light blue, green, light pink, and purple. Trim the floss to be 1 m (39 in) in length, then fold them evenly in half to create 8 strands of floss. Tie an overhand knot at the top to form a loop. This will be one end of your bracelet. Don’t have a measuring tape on hand to measure out your floss? No worries! Some bracelet-making pros recommend cutting each strand to be the length of your wingspan.
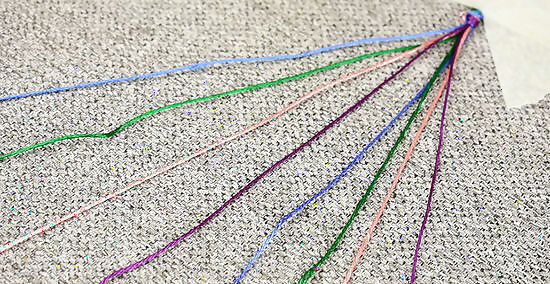
Tape the loop to a flat surface and spread out your strands. Once your strings are tied together, tape the loop or knot to a table, clipboard, or book. Then, spread out the strands so the colors follow a repeated pattern. If you’re following our example, lay your strings in this order: light blue, green, light pink, purple, light blue, green, light pink, purple.
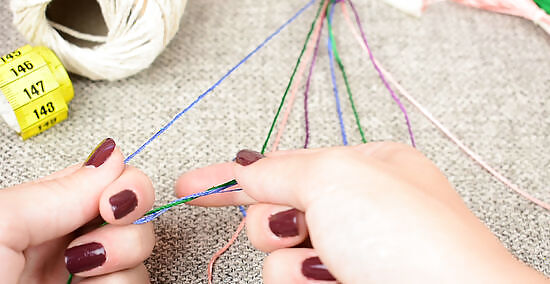
Bring the first strand over and under the second strand to tie a knot. This is called a forward knot in friendship bracelet making and moves the left-most string to the right. Hold the second (green) string taught with your non-dominant hand, then use your dominant hand to place the first string (light blue) over it. Next, pull the end of the first string up and under the second string, creating a figure 4 shape. Pull the first string upward to create your first knot. Repeat this to create a second knot and complete the forward knot.
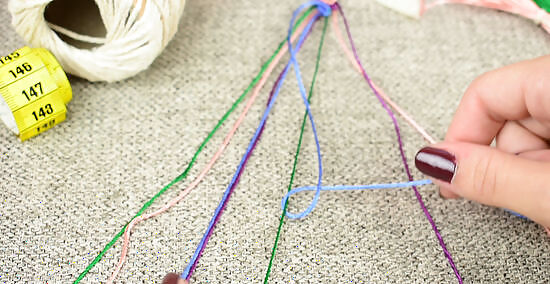
Continue making forward knots on all of the strands. After knotting the second strand, move on to the third, making a figure 4 shape twice with the first strand over the third strand. Keep knotting until you’ve knotted the final strand (if you’re following our example, that would be the second light pink string) and the first strand is in the far right position. Pull on the thread just until you feel resistance. Be careful not to pull too tight! If some knots are tighter than others, the bracelet will look lumpy and uneven instead of neat and sleek.
Start the process again with the second or far left strand. After making your first row of knots, the second strand will be in the first position (if you’re following our example, that’s the first green thread). Follow the same knotting technique as before, bringing the left-most thread over and under the strand next to it on the right until you’ve knotted all the strands (including the one you knotted with previously).
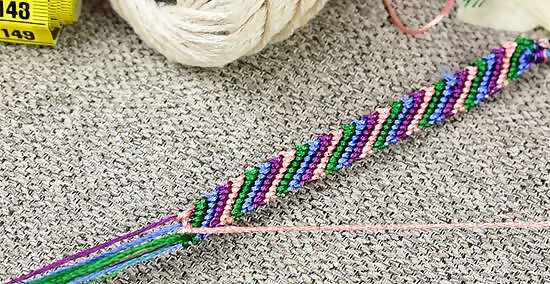
Keep knotting until the bracelet is long enough for your wrist. This will be roughly 7 in (18 cm). Continue the knotting pattern, moving through each string. As you knot, you’ll notice a candy stripe pattern forming, with each row being a consecutive color. Once the bracelet is long enough to wrap around your wrist, finish the row you’re knotting, and tie all the strings together with another overhand knot. Trim away any excess string after you’ve tied the bracelet onto your wrist. For extra pizzazz, braid the end of your bracelet so it’s easier to tie through the bracelet’s loop. Customize your friendship bracelet even more by adding charms or beads to the ends. Simply thread the charms or beads to the leftover strands and tie a knot or braid to secure it in place.
Beaded Friendship Bracelet
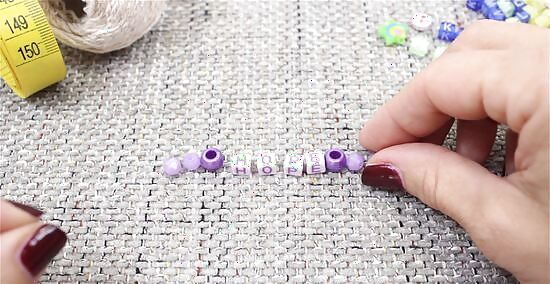
Lay out your bead pattern. Before you start making your beaded friendship bracelet, it’s important to decide what you want to create. Take a look at your beads, and then play around with different patterns, colors, and sizes. What do you think will look best? Laying out the pattern beforehand can help you visualize your vision. This can be extremely helpful if you want to use letter beads to spell something or put a special bead in the center of the bracelet. Try a colorful pattern, alternating between the colors of the rainbow and silver, shiny beads. Add your favorite lyrics or inspirational words to a bracelet. For example, words like “hope” and “gold rush” would be perfect for a fully gold beaded bracelet. Try using a bead board to lay out your beads to prevent them from rolling around.
Cut a piece of elastic that’s around 8 in (20 cm) long. Stretchy cord or elastic is the best to use for beaded friendship bracelets. Stick with a clear cord or opt for a colored cord that matches your beads—the choice is up to you. Alternatively, you can keep the cord on its spool while beading if you’re worried about beads falling off or the overall size of the bracelet. If you’re using a stretchy cord, stretch it out before you start beading. This can help prevent future snapping. Elastic cord comes in lots of sizes, with the highest numbers being the thickest cord. We suggest using 0.5mm or 0.8mm size cord for beaded friendship bracelets.
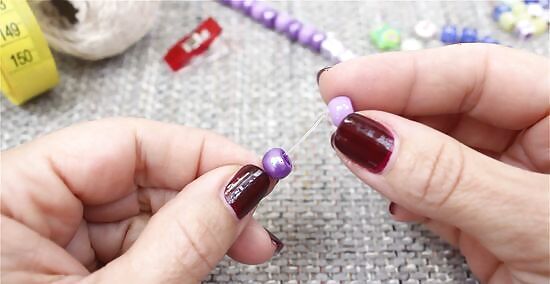
String the beads onto the cord. Now it’s time to make your friendship bracelet. All you have to do is take the beads you picked out and thread them onto your chosen string—it’s as simple as that! Continue beading until you’ve used up all your beads and/or the bracelet is around 7 in (18 cm) (or your wrist size). Place a binder clip or stick a piece of tape at the end of the string to prevent the beds from spilling off the cord while you bead.

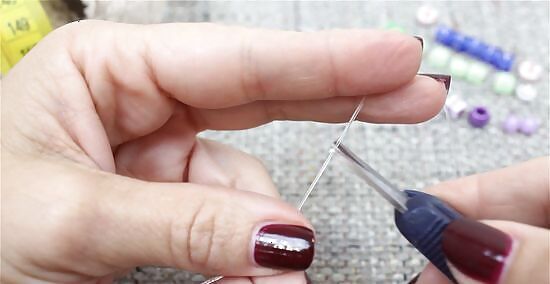
Tie the bracelet with a square knot. Working with stretch cord or elastic can be tricky, and a simple knot doesn’t always cut it. To keep your bracelet from falling apart, secure it with a square knot. Loop the right side of the elastic over the left side, pulling it underneath. Then, loop the left side over the right side and pull tightly. Alternatively, some bracelet makers prefer using a surgeon’s knot to secure their bracelets. To do this, simply loop the right side over the left side twice and the left side over the right side once. For extra security, dab a bit of clear nail polish or craft glue on the knot.
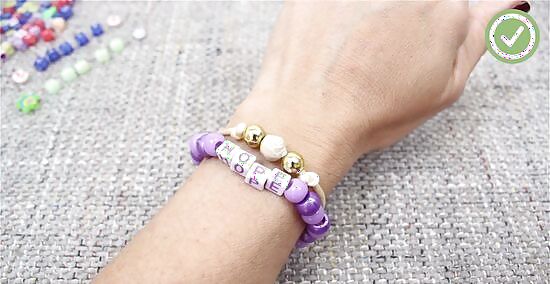
Trim off the excess cord and wear your bracelet with pride. Tuck a bit of spare elastic through the surrounding beads, then trim off the excess. Now, all that’s left to do is wear, trade, and show off your beautiful beaded creation!


Comments
0 comment