
Making an Easel with Wood

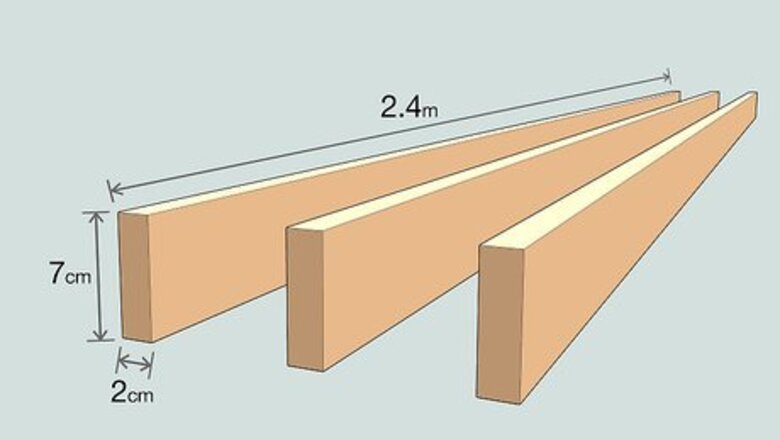
Buy 3 pieces of wood that are about 2.4 m (7.9 ft) long. The timber can be a little shorter or longer, but try to get pretty close to this measurement. Additionally, each piece of wood should be 7 cm (0.23 ft) wide and 2 cm (0.79 in) thick. The best wood for this is pine, but you can use any wood you have at your disposal.
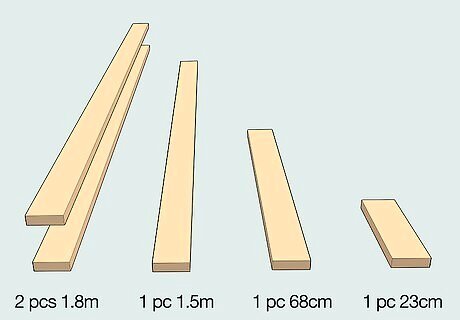
Measure and cut the wood into 5 separate pieces. Use a tape measure to measure the correct length for each piece and mark the wood with a pencil. Place the timber on a solid, steady work surface and cut it with either a hand saw or a power saw. Cut the wood down to the following lengths: 2 pieces that are 1.8 m (5.9 ft) long (main legs) 1 piece that is 1.5 m (4.9 ft) long (back leg) 1 piece that is 68 cm (27 in) long (cross piece) 1 piece that is 23 cm (9.1 in) long (cross piece) Be sure to take the proper safety precautions when using a saw.
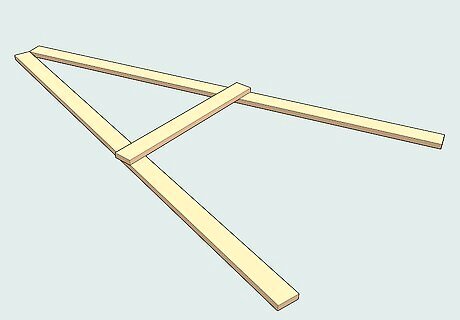
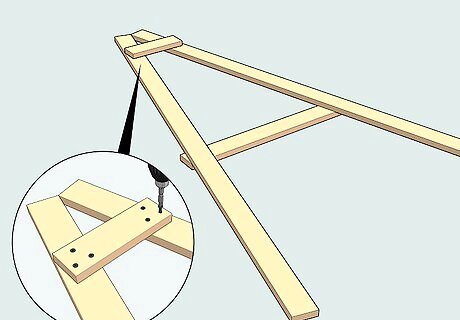
Lay the wood out in a capital "A" shape. Lay out the 2 pieces of 1.8 m (5.9 ft) wood so they form the 2 sides of the "A." Then, place the 68 cm (27 in) piece down so it forms the horizontal line in the middle of the "A."
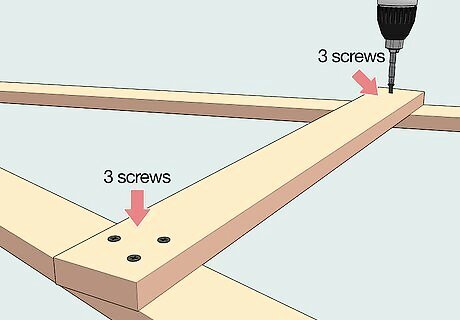
Secure the 68 cm (27 in) piece to the 1.8 m (5.9 ft) pieces with screws. Drill 3 screws into each side of the 68 cm (27 in) piece of wood to secure it to the 1.8 m (5.9 ft) pieces. You can use a hammer and nails if you don't have a drill and screws. You can lean the "A" shaped frame against a wall and use it if you don't want to finish building your easel. Make sure the wood pieces are on a steady and stable work surface before you use the drill.
Attach the 23 cm (9.1 in) piece at the top of the "A." Flip the "A" frame over carefully and place the 23 cm (9.1 in) piece across the top of the "A." Attach the 23 cm (9.1 in) piece to the wooden frame using a drill or a hammer. Flip the "A" frame over carefully so you don't damage the wood or pull the screws loose.

Attach a hinge and secure the 1.5 m (4.9 ft) piece below it with screws. Place a hinge facing downwards, with the leaf pointing towards the bottom of the "A," and position it at the center of the 23 cm (9.1 in) piece. Use your drill to secure the hinge to the wooden piece. Then, push the 1.5 metres (4.9 ft) piece under the hinge, touching the underside of the 23 centimetres (9.1 in) piece, and secure it to the hinge with screws. The hinge will secure the back leg of the easel to the rest of the frame.

Drill a hole in the center of the 68 cm (27 in) piece and the back leg. Stand the easel upright and drill the holes to be slightly wider than the width of your piece of rope. Then, thread the rope through both holes, tie a knot on each end so it won't slide through the holes, and cut off the excess rope on each side. The rope will provide extra support for the back leg of the easel. To make the drilling easier, hold the back leg up against the horizontal piece when you're drilling. This will let you create 2 holes at once.
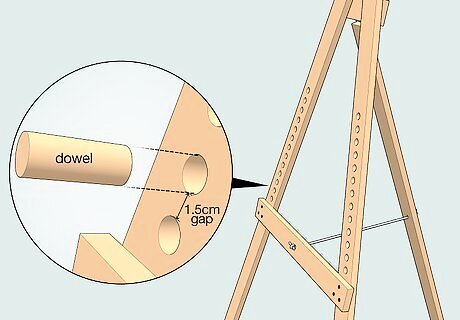
Drill dowel holes at 1.5 centimetres (0.59 in) gaps on the frame. Measure and mark the wood with a pencil. Then, starting at the 68 centimetres (27 in) horizontal bar, drill the holes on both 1.8 centimetres (0.059 ft) pieces. Make the holes close to the diameter of the dowel so the dowel fits tightly in the holes. These dowel holes will let you adjust the support bar of the easel.
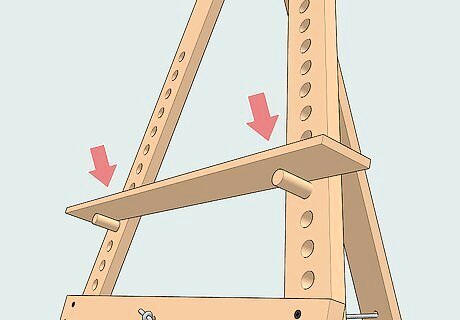
Place the dowel into the holes and a cross-member on top. Push the dowel into the holes with as much force as you need to use to get it through the hole. The cross-member should be slightly wider than the frame when it's laid on top of the dowels and will support your canvas while it's on the easel. You can even make cross-members of different sizes for each dowel hole on your easel, if you like.
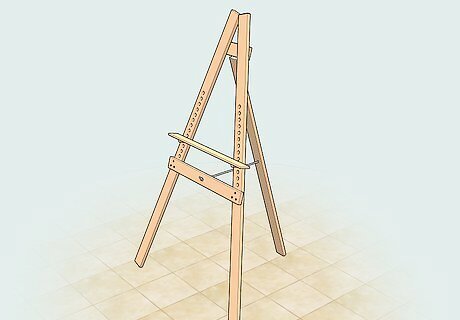
Stand the completed easel up on its 2 main legs. Then, position the back leg to balance the easel and use it to adjust the tilt the way you like it. Place your canvas on the 68 cm (27 in) cross piece and move the dowel up or down to adjust the height to accommodate the size of your canvas! You can paint or stain your easel, if desired, or leave the raw wood exposed. It's up to you!
Creating a Cardboard Easel
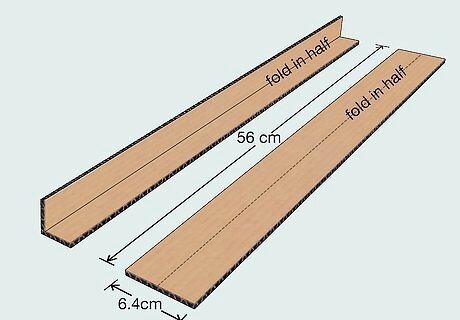
Cut 2 strips of cardboard, 56 cm (22 in) long by 6.4 cm (2.5 in) wide. Lay your cardboard flat on a work surface. Mark these measurements on the cardboard and cut the strips. Then, mark a line up the center of the strips and fold them in half using the center line as a guide. Use a sharp utility knife or sharp scissors to cut your cardboard.
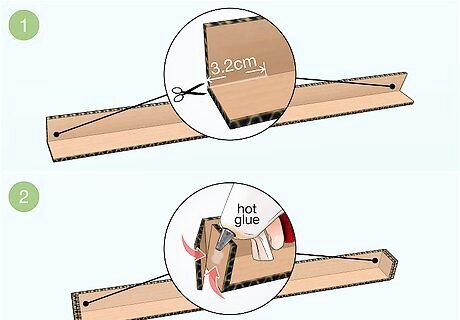
Create 2 tabs and glue them together for support. Measure 3.2 cm (1.3 in) from the end of each strip and cut them to create tabs. Then, fold these tabs over each other and glue them together with hot glue. Folding the tabs will reinforce the ends of the cardboard strips.
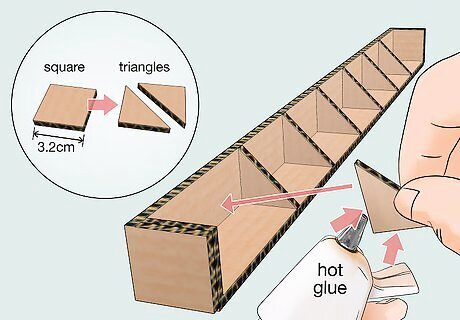
Cut 4-8 squares of cardboard that are 3.2 cm (1.3 in) each. Don't cut these squares out of your strips! Use the rest of the cardboard you have. Then, cut the squares in half diagonally to create perfect triangles. Place the top end of each triangle on top of the fold line. Put glue on the sides of your triangles and put them in place along the strips. These triangles will provide support to your long cardboard strips.
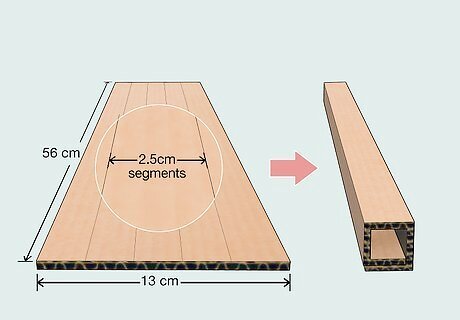
Cut a 13 cm (5.1 in) wide by 56 cm (22 in) long strip of cardboard. To make this easier, cut your big piece of cardboard so it's 56 cm (22 in) in length. Then measure and mark the 2.5 cm (0.98 in) segments along the cardboard. Cut along the lines and fold the pieces over to create a square tube.
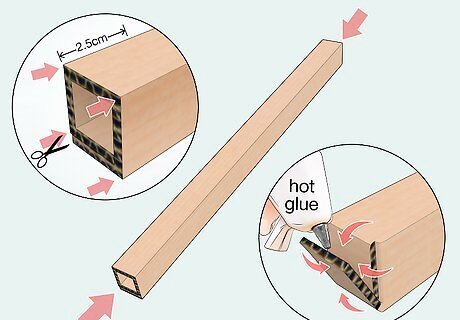
Make 2.5 cm (0.98 in) tabs on each end of your square tube. Measure from each end of the strip, mark lines across the segments, and cut along the lines. Fold the strips at each end to make tabs. Then, fold your square and tabs up and glue it all together. Place glue on your segments before you roll your square tube up.
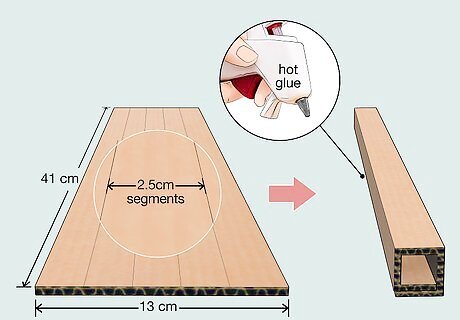
Measure and cut out a 13 cm (5.1 in) by 41 cm (16 in) rectangle. Using the rest of your cardboard, mark this rectangle with a pencil and cut it out. Measure and mark 5 2.5 cm (0.98 in) segments on the rectangle. Then, fold these segments to create a square tube that is approximately 2.5 cm (0.98 in) thick and 41 cm (16 in) long and glue it. Folding the cardboard like this will create sturdy legs for your easel.

Pierce the cardboard to connect the 3 56 cm (22 in) long legs. Make a mark at 3.8 cm (1.5 in) from the end on one of the legs. Flip it over so you can make a mark on the back side, then piece through both holes with a pencil. Place the other 2 legs right next to the pierced leg, mark holes at the same place, and push the pencil through these holes. Then, lay the 3 legs side by side and push the pencil all the way through to connect them. The pencil is what holds the legs together. Stand the 3 legs up, then push 2 of the legs forward to be the main legs, and push the middle leg back to be the support leg.

Place the easel flat and glue the cross-member to the 2 side legs. There's no need to glue the cross-member to the support leg as the support leg needs to be able to move. Mark your desired distance on each side leg and place some glue at that point. Put your cross-member square tube on top of the glue and let it dry for 20 minutes or so.
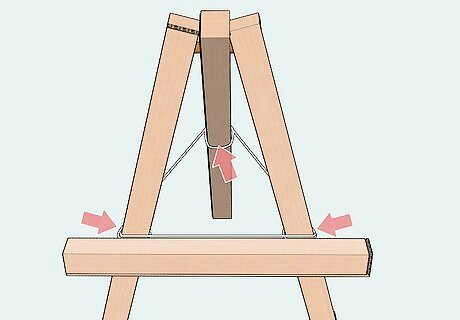
Tie string around all 3 legs and stand your easel up. At this point, you've connected all 3 legs and you've connected the cross-member to the 2 side legs. The string will provide additional support to your easel by preventing the support leg from sliding too far back.
Using Pipe
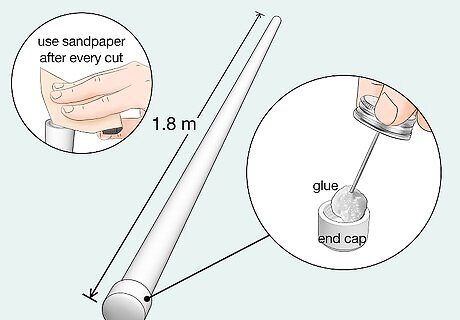
Cut a 1.8 m (5.9 ft) piece of pipe with a saw. If you have a miter box, use that to help you cut your pipe. Miter boxes are designed to allow a hand saw to make precise cuts on an item. Use 150-grit sandpaper on the ends of your 6 ft (1.8 m) pipe to get rid of any jagged edges. Then, pour some glue on an end cap and attach it to the pipe. If you don't have a miter box, use your handsaw to cut the pipe.
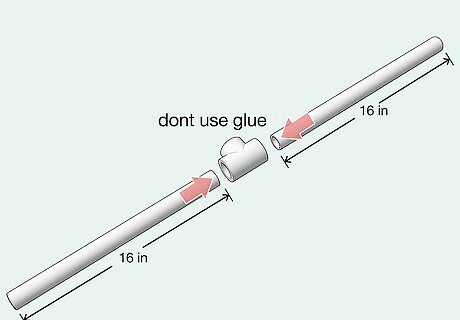
Cut 2 more pieces of pipe to a length of 41 cm (16 in). While the glue cap dries onto the other piece, you can work with the other pieces. Sand the ends after you make your cuts. Then, push the pieces of pipe into the hole in the connector to attach it to the T fitting. A T fitting piece is a pipe connector in the shape of the letter "T." There's no need to glue them or stick them to the connector.

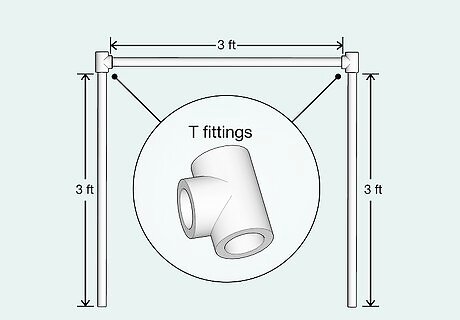
Cut 8 pieces of pipe and glue them to the fittings. Cut 2 46 cm (18 in) pieces of pipe, sand the ends, and glue them to the elbow fittings to create a large U-shape. Then, cut 6 pieces of pipe, 0.91 m (36 in) in length and sand the ends.

Connect 3 of these pieces with T fittings to make an inverted U-shape. Place the pipes so that the bottom part of the T fitting is pointing upwards. Connect the pieces on a flat work surface for accuracy. Then, slide the 2 units of pipe together to form a large rectangle. Attach the 2 U-shaped pipe pieces together with glue. Give the glue around an hour to dry after you've put the 2 U's together.
Connect the remaining 3 pieces with T fittings to make an inverted U-shape. You can do this the exact same way you connected the last 3 pieces of pipe with the T fitting. Just make sure that the open end at the center of the T fitting is pointing upward when you're finished. Use a flat work surface to connect the pieces.
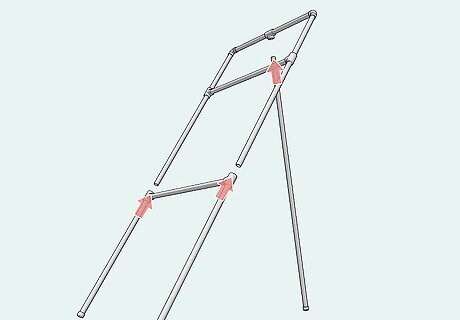
Insert the inverted U piece into the other large piece of pipe and glue it. Stick the 1.8 m (5.9 ft) piece to the T fitting at the top of the shape. This large piece of pipe will act as the tripod for your easel. Put glue on 1 end of your pipe and stick into 1 of the open T fittings on your base. You're finished building the base of your easel at this point.
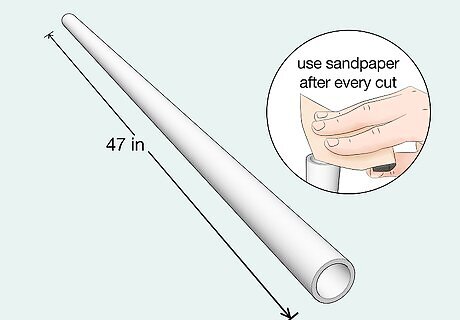
Cut a 1.2 metres (47 in) piece of pipe and sand the ends. Place the pipe on your miter box and use your hand-saw to cut it. If you don't have a miter box, mark the measurements using a pencil and measuring tape before you cut it. Use 150-grit sandpaper on the ends of the pipe.
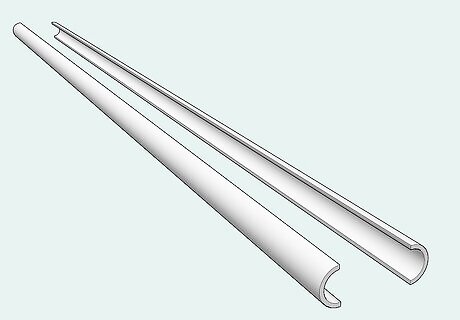
Cut the pipe lengthwise into 2 half sections of pipe. You want to cut the pipe so you have 2 long half-pipe sections. Lay the pipe flat on your work surface and slice it in half until you break through the wall. Flip the pipe over and cut it in half again until you break the wall and the pipe is separated into 2 long pieces.
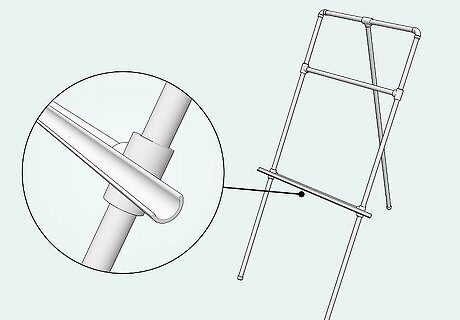
Set the completed easel upright on its legs on a flat surface. Then, place a half-pipe section against the bottom rung on the front side of the easel. The half-pipe should overhang by several centimeters on each side.
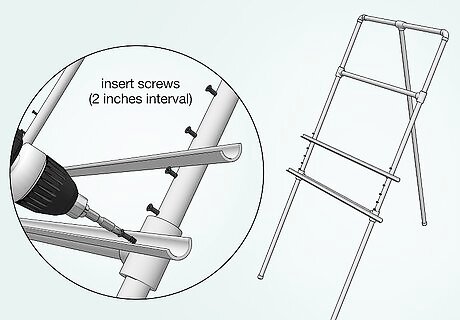
Attach the half-pipe sections with sheet metal screws. Measure at intervals of 5.1 cm (2.0 in) up the length of your easel from the middle. Mark the height marks on each side using your pencil. Then, drill holes through the pipe where you've marked the rungs. Use a screwdriver to put your screws into these holes. Use your 1.2 metres (47 in) pieces to act as the cross-member.


Comments
0 comment