

Designing and Planning
Learn as much as you can about ball jointed dolls. Read online articles about bjds (ball jointed dolls). Familiarize yourself with how they are constructed and strung together. If possible, try to handle a bjd in person. Lastly, be familiar with the metric system, especially if you plan to sell your sculpt. Ball jointed dolls are always measured in centimeters. Their eyes are always measured in millimeters. If you plan to sell your sculpt, use these as your primary measurements. Ball jointed doll forums and social media groups are great places learn more about these dolls.

Choose the size of doll you want to make. There are 3 main sizes of bjds: yoSD, MSD, and SD. SDs are typically 55 to 57 cm (22 to 22 in) tall. They are sometimes called SD10. SD13 are typically 57 to 60 cm (22 to 24 in) tall. You can also get them larger: 65 to 72 cm (26 to 28 in). MSDs are typically 42 to 44 cm (17 to 17 in) tall. Yo-SDs are typically 26.5 cm (10.4 in) tall. SD stands for "Super Dollfie," MSD stands for "Mini Super Dollfie," and "Yo SD" stands for "Yo Super Dollfie." The larger your doll is, the more expensive it will be to cast.

Decide whether you want a child-like or mature-looking doll. Most SD dolls tend to have mature proportions with full breasts or defined muscles. Some of them can have softer, more child-like bodies, such as the dolls made by Volks. MSD dolls tend to have child-like, but you can get mature ones too, like the Fairyland MiniFee. Most yoSD dolls have childlike features, but you can make one that is more mature and slender. Mature yoSDs are usually known as mature tinies.
Decide between a realistic or stylistic style. Bjds are closely related to Dollfie Dreams, which look like anime characters. As such, even realistic bjds have slightly longer legs, bigger busts, and narrower waists than the average human. Some sculptors like to make their dolls even more stylized, with long, slender, willowy bodies. A great example are Dollzone and Doll Chateau dolls. Consider making an anthro or animal doll. They tend to be yoSD sized with childlike proportions. Cats and rabbits are the most popular.

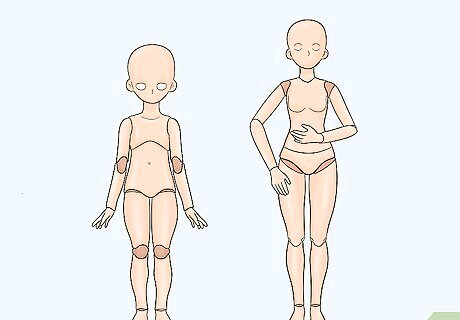
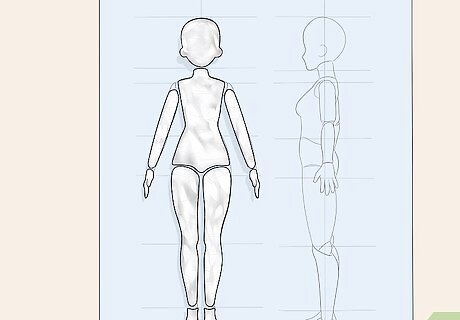
Draw a full-sized, anatomical sketch of your doll from the front and side. One of the things that makes a bjd different from other dolls is that they are anatomically correct. This means that male dolls have penises and female dolls have vaginal slits. The sketch needs to match the size of the doll you are making in centimeters/inches. The genitals do not have to be realistic or highly-detailed. They can be a simple bulge or slit.
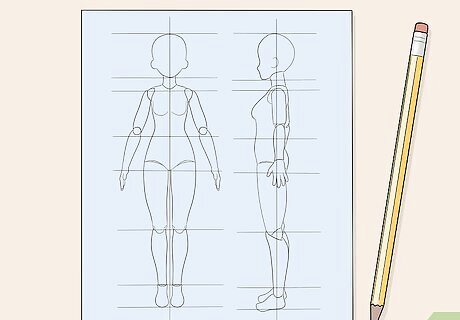
Add the joints in the arms, legs, and head. A basic bjd will have joints in the following area: ankles, knees, thighs/hips, wrists, elbows, and arms/shoulders. It will also have 1 or 2 joints in the torso, as well as a joint in the neck/base of head. A torso joint is typically in 1 of the following areas: ribcage/waist, under-bust, or hips (underwear line). Some dolls are double-jointed in the elbows and knees. This means that the joint is a separate piece that fits into the knee and elbow sockets. The thighs fit into sockets in the hips, and have a vertical slit for the elastic so that the doll can sit. Some dolls have a separate joint in the upper thigh. This joint is a clean, horizontal line.
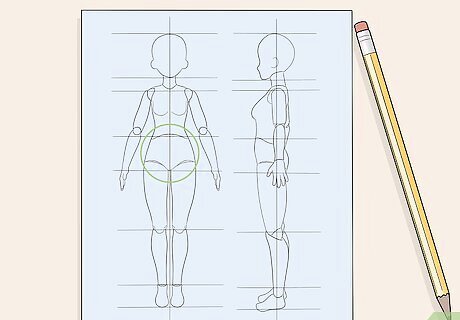
Add a sketch for the core, if desired. You don't have to do this, but you can if you want to. The core will simply help you figure out how big to make the hollow parts of the doll. You can draw the core on tracing paper, then tape it over your sketch, or you can dry the core directly onto your sketch.
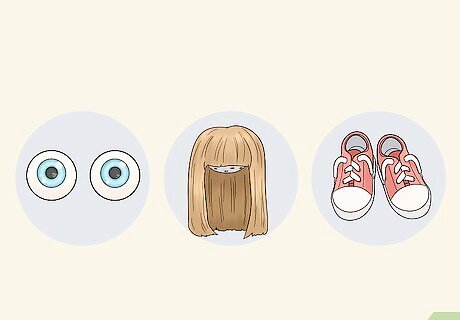
Ensure that your doll will fit other companies' eyes, wigs, and shoes. Bjds come bald and without eyes. While you can make wigs and eyes yourself, these can be time consuming, difficult, and expensive. Most people just buy the eyes, wigs, and shoes from various bjd companies. To make your shopping easier, ensure that your doll fits the standard sizes. BJD eyes are sold in even sized numbers ranging from 6 mm to 24 mm. BJD wigs are sold in inches based on the head circumference. A 7.5 wig will fit a doll with a 7 ⁄2 in (19 cm) head. BDS shoes are sold in mm sizes. Your doll's foot needs to be small enough to fit inside the shoe.
Building the Armature and Core
Build an armature and core out of foam or aluminum foil. Carve foam into shapes for the head, torso, and limbs. Make the head, limbs, and torso separate pieces, but don't add any joints yet. Wrap foam with plastic wrap, and aluminum foil with masking tape. Leave 2 to 5mm between the core and the outline of your anatomical sketch. You can use straws for the arms and legs. Regular drinking straws will work for yoSD and MSD dolls. Large or "boba" drinking straws will work better for SD dolls.
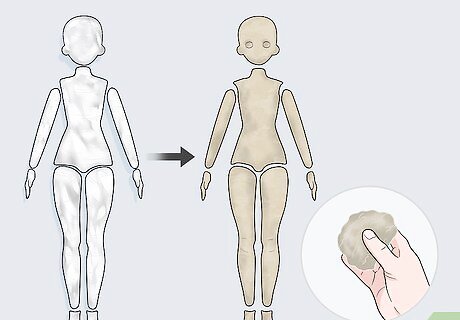
Cover your core with clay and add rough hip and shoulder sockets. Use paper clay to build over each of your core pieces (torso, head, arms, and legs). Do not include any details, but do add sockets into the torso for the shoulder and hips. Add 2 round balls to the head to make room for the eye sockets. Make sure that they match the size of the eyes you want your doll to wear.

Let the clay dry, then cut it apart and remove the core. Allow the paper clay to dry completely. Once it has dried, use a dremel rotary tool or a craft blade to slice the torso and limb pieces along the sides. Cut the head apart along the crown. Remove the core from inside the paper clay shell. The head will be in 2 separate pieces: a head and head cap. The cut should go around the forehead, above the ears, and the back of the nape. If the eye socket balls remained in the head, be sure to pull those out too. Save the core pieces for casting.

Reassemble the torso and limb shells with glue and more clay. Use super glue to reassemble the cut pieces, sans core. Smooth over the seams with more paper clay to make them nice and strong. Do not reassemble the head and head cap. These will remain separate.
Sculpting the Doll

Add more paper clay onto the doll's body and refine it. Use more paper clay to sculpt over the doll's torso, limbs, and head. This time, pay attention to the details, such as muscles, facial features, and genitals. Reference anatomical draws as much as possible.

Sculpt the hands and feet with rounded tops. You can build these from scratch or work over an armature. BJD hands and feet at solid through, so you don't need to cut these apart. Make the tops of the wrists and ankles rounded so that they can fit into the ankle and wrist sockets.

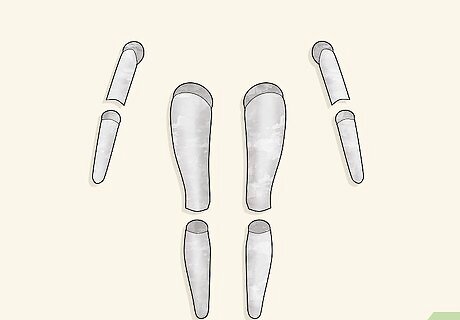
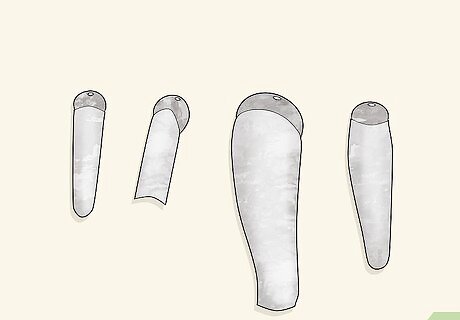
Cut the doll apart along the joints, making them angled. Use a dremel or craft blade to slice the doll apart at the torso, knees, and elbow. Next, cut the tops of the lower arms and legs off at a slight angle. Do the same for the bottoms of the upper arms and thighs. This will allow the doll to move their arms and knees more freely. The angles need to slant away from the elbows and knees.
Sculpt new joints and sockets. Add balls to the tops of the lower arms and legs, then cover them with plastic wrap. Add some clay to the bottoms of the upper arms and thighs, then squish the balls against them to create sockets. Add some balls to the tops of the upper arms. Make them perpendicular to the arm rather than right on top. This will allow the arms to hang straight down. Make the top of the bottom torso piece taper in a little, then soften the inside edge of the upper torso piece. This allows them to fit together like stacked bowls.
Add stringing holes to the balls and sockets. Add a stringing hole to the top of the shoulder, elbow, hip, and knee balls. Add a hole to the top of the neck too, if it got covered up. Make sure that the holes are the same size as the channels inside the limbs. Work while the clay is still wet. If the clay dried, use a dremel to make the holes.
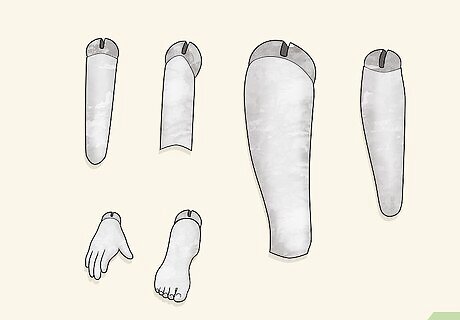
Cut stringing slits into the balls, including the ankle and wrist balls. The slits need to run from the stringing hole to the bottom edge of the ball where it touches the limb. Make the slits run in the following directions: Upper thighs: center-front of the thigh ball. The slit needs to be long enough so that the doll can sit while strung. Knees: back-center of the knee balls Shoulders: inside the arm, where the ball fits into the socket. Elbow: center-front of the inside arm. Feet: across the entire ball, running parallel to the length of the feet. Hands: across the entire ball, from palm to the top of the hand.
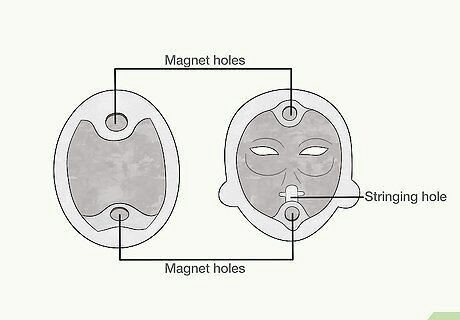
Add magnet and stringing holes to the head and head cap. When you pull the head cap (top of the head) away, you'll see a set of magnets: 1 above the forehead and 1 above the nape. You should use a dremel to drill similar holes into your doll's head and head cap so that you can insert magnets. Don't add the magnets yet. You will add them after you cast the doll. A bjd's head will also have a small hole in the bottom where the neck joint is. This hole is the same size as the neck hole. It also has a vertical slit that is wide enough for the elastic and S-hook.

Add hook bars to the ankle and wrist balls. You can do this by inserting a piece of wire perpendicular to the slit, or you can add some clay to the top of the slit. This will allow the hook to latch onto the hands and feet.
Casting the Doll

Let the clay dry, then prime and sand the doll. Coat the doll with a few layers of surface primer. Let it dry, then sand it with fine-grit sandpaper. Do this a few times until you get the finish that you like and you can no longer see the clay.
Test the stringing and work out any kinks. While not completely necessary, this will save you a lot of grief in the future. String your doll using the last method or an online tutorial. Make sure that the joints fit and move properly. The doll should be able to stand on its own. Use loose stringing for this part. If you make it too tight, you risk breaking the clay.
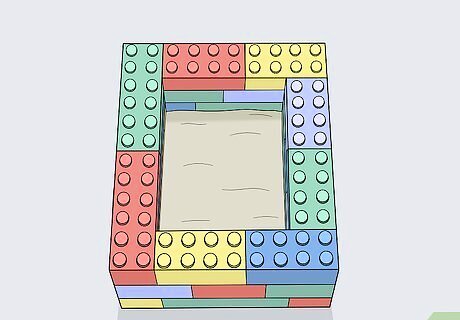
Build the mold box out of Lego bricks, and fill the bottom with clay. You will need 1 mold box for each piece that you cast, but smaller pieces, like yoSD dolls, hands, and feet can fit into a single mold box. Make the walls taller than the piece when it is laying down on its side. Fill the bottom of each mold box with stone or ceramic clay (not paper clay) to prevent leaks. Don't let the clay dry.

Set the pieces into the mold boxes. Press the pieces halfway into the clay. Feet should be placed on their sides, and hands should be placed flat so that all fingers are visible. The head and head cap need to sit flat on the clay. BJDs have seams running down the sides of each piece, so set them into the clay accordingly. Place different sized marbles into the corners of the box. This will allow you to align the mold pieces during casting.

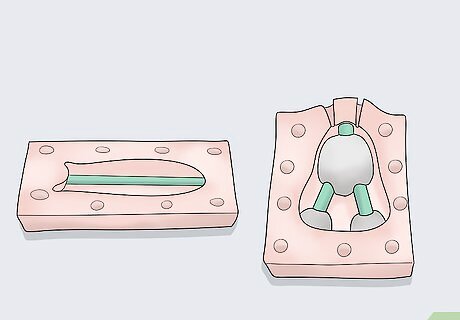
Fill the mold boxes with silicone and let it set. Buy high-quality casting silicone from a casting shop or an online store. Mix together Parts A and B, then pour them into the mold. Let the silicone set. Use a good-quality silicone from a casting supply store. Do not use cheap silicone from the home improvement store.

Remove the silicone, reverse it, and fill the second half. Take everything out of the mold box. Set the silicone mold into the box with the cavity facing up. Place the piece back into the silicone mold. Coat the top of the mold with mold release, then fill the rest of the mold with more silicone. Let the silicone set.
Insert the core into the molds. Take everything out of the molds. Insert your straw cores into the molds. When you get to the torso and head molds, insert straws into the cores where the stringing holes are, then set them into the molds. Secure the molds with rubber bands. Cover Styrofoam core pieces with plastic wrap or masking tape, or the resin will sink into them.
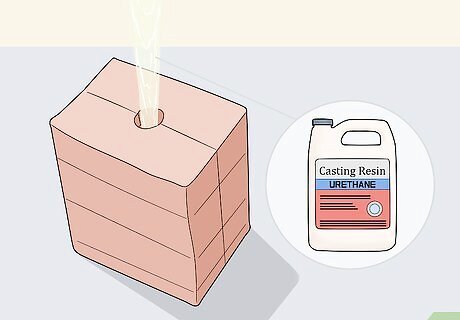
Cast the doll in urethane resin. Bjds come in all sizes, shapes, and colors, but there is one thing that they all have in common: they are made from urethane resin. Purchase the resin from a casting supply store, then tint it the color you want using resin dye. If you want the doll to be made from "French" resin, purchase a semi-translucent urethane resin. Most dolls are skin-toned, ranging from fair to tan to dark, but some are white. You can also try a fantasy color, such as gray or purple.

Let the resin cure, then de-mold the pieces. How long the resin takes to cure depends on the type that you used. This can be a few minutes to a few hours. Once the resin has cured, remove the pieces from the molds, then take out the core pieces. If a piece came out warped, you may have to re-cast it.

Ask a casting company to cast your doll for you if you can't do it yourself. Most bjd companies won't cast dolls for other people, but there are lots of other companies that will. Visit some bjd sculpting communities, and research what casting companies are willing to cast bjds. Be aware that casting companies typically have a minimum requirement of 10 dolls. If you are serious about this, consider doing a pre-order. A pre-order is where other people purchase the doll from you. Once the company casts the dolls and ships them to you, you will have to ship the dolls to your customers.
Assembling the Doll

Sand the doll's seams and do any extra drilling. Be sure that you wear a respirator mask for fine dust particles when you sand the pieces. You can sand the pieces with a dremel or sandpaper. Start off with a rough grit, and finish with a finer grit. If a stringing hole got filled, you will have to drill it with a dremel. Check the S-hook bars in the ankle and wrist bars to ensure that they haven't been filled in.

Add silver neodymium magnets into the doll's head cap. Purchase these magnets online in a size that matches the holes that you made. Glue the magnets into the holes with super glue. Make sure that the polarities are correct. Do not use regular magnets. They are not strong enough.
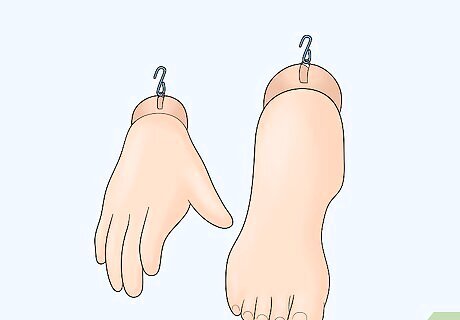
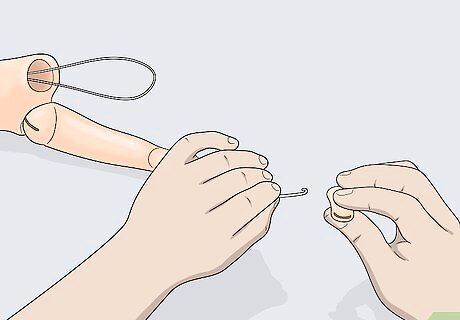
Hook small S-hooks over the bars on the wrist and ankle balls. Buy some small S-hooks from an online bjd shop or a hardware store. Make sure that they are small enough to fit inside the stringing channels, then hook them over the wrists and ankles. Have a large S hook ready for the head.
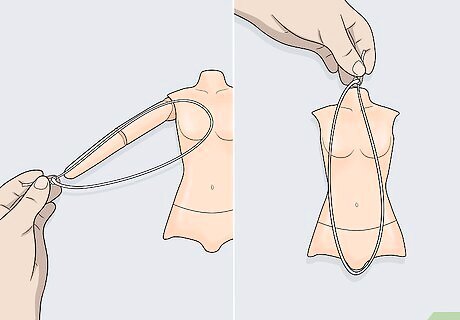
Cut and tie round, white elastic for the arms and legs. Measure the distance from the left wrist to the center of the chest, double it, then cut a piece of elastic according to that measurement. Next, measure the doll from the top of the neck to the bottom of the torso, double it, and cut another piece of elastic. Tie both pieces of elastic into loops. The thickness of the elastic depends on the size of the doll and the stringing channels. The bigger your doll is, the thicker the elastic needs to be. Bjds use round (not flat) elastic that is white in color, which you can find in online bjd stores.
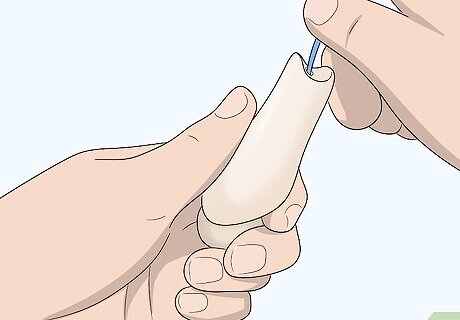
String your doll with the elastic. Thread the shorter piece through the arms and latch it onto the S-hooks. Fold the larger loop in half. Latch it onto the large S-hook, then pull it down through the neck and torso. Pull each half through each leg, then latch it onto the S-hooks too. Use a pipe cleaner or a bjd stringing tool to string your doll. You can find bjd stringing tools in online bjd stores. If you are confused about stringing your bjd, look up video tutorials online or ask a fellow hobbyist to assist you.

Give your doll a faceup, eyes, wig, and clothing. You can give the doll a faceup using an online tutorial, or you can commission a fellow hobbyist to do it for you. Purchase clothing, shoes, eyes, and a wig for your doll from a bjd supply. The wig should fit comfortably over your doll's head, but you will need to insert the eyes using poster tack or silicone ear putty. A faceup refers to the blushing, lip color, lashes, and eyebrows applied to a doll's face. Do not use polymer clay to set the eyes, or you will stain the resin. Be careful what supplies you use for your doll's faceup. Specific brands are recommended for a reason; other brands may melt the resin. If you know how to sew, you can make your doll's clothes yourself. Some people sell bjd patterns, but they may not fit your doll.


Comments
0 comment