
- Sterilize your glass bottles by boiling them on the stove, or soaking them in a bleach solution. Then, pour your cider into the bottles, filling each bottle to the neck.
- Add 2 tsp (10 g ) of priming sugar to each bottle to create a sweet, carbonated cider. Then cap your bottles with a crimper and let them sit for 1-2 weeks.
- Make a sweet, still cider by adding 1 tsp (5 g) of sugar to each bottle, then boiling the bottles in a pot of water until the reach 66 °C (151 °F) before capping.
Racking Your Cider for Double Fermentation

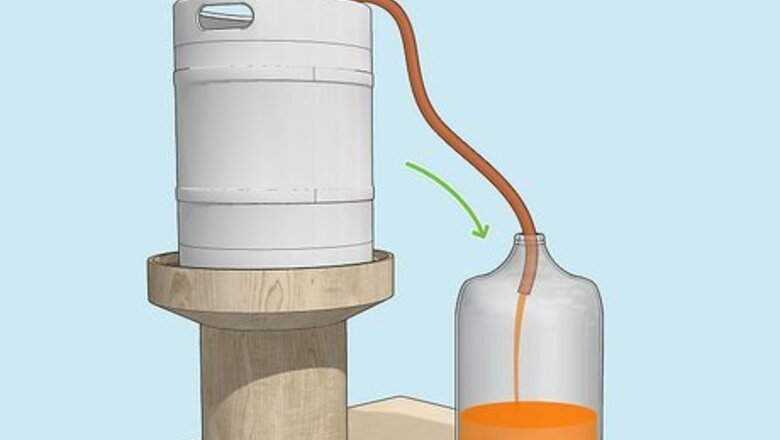
Siphon your fermented cider into a carboy container. “Racking” your cider into a second container before bottling separates the liquid from the sediment, making for a clearer cider. Place your carboy or keg of cider on an elevated surface, like a table or a bench, and place the empty carboy lower, like on the floor. Then, siphon the cider into the empty carboy. As you do, keep the mouth of the siphon away from the sediment on the bottom of the first carboy. To use an automated siphon, place the pump end in the first carboy, and the other end in the empty carboy. Follow the instructions on the siphon’s packaging to operate it—typically, work the pump to get it going, then let it vacuum the cider on its own. Or, use a basic plastic or silicone tube to siphon. Place the ends of the tube in the carboys. Then, use the tube as a straw to suck the cider into the second, empty carboy, starting the vacuum.

Or, filter your cider into a second container with a funnel. Place a funnel in the mouth of the second, empty carboy or keg. Then, place a double-layer of cheesecloth into the funnel to catch any sediment. Slowly pour the cider from the first carboy into the funnel, making sure to let the cider drain through the funnel with each pour to avoid spills. Recruit a helping hand to help you lift and pour the carboy. Lifting a full carboy on your own may result in spills or injury. Funneling your cider will result in a bit more sediment in the final product than siphoning, but it’s handy for any homebrewers with limited tools.
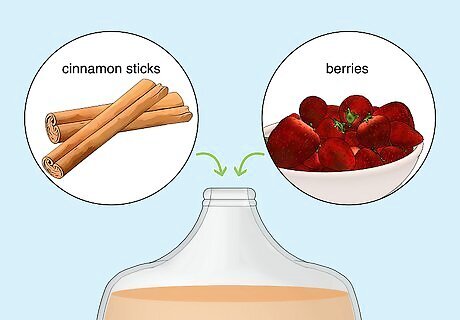
Flavor your cider with cinnamon or fruit, if desired. If you want to add a bit of depth or a fun twist to your cider, now’s the time. Add a handful of fresh berries, like blueberries, strawberries, or raspberries to your carboy to give it a sweet undertone. Or, add 2-3 cinnamon sticks to give your batch an autumnal kick. You might also add a can of frozen fruit juice concentrate—just be sure to use one that’s 100% juice and avoid sweeteners, otherwise your cider might come out much too sweet.
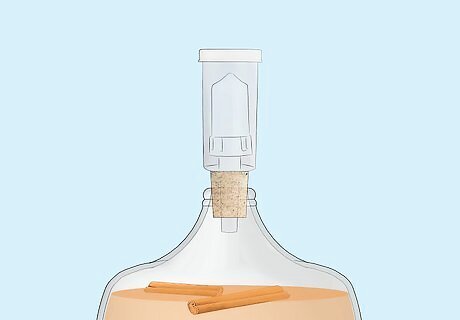
Place an airlock on the second carboy and let the cider ferment again. Replace your airlock on the new carboy, stoppering the carboy with the cork and filling the lock halfway with water. Or, make a new airlock. Let the cider sit in a cool (40–60 °F (4–16 °C)), dark environment for 3 weeks to 6 months. After a few weeks, open the carboy and stick a hydrometer into the cider. Aim for a specific gravity reading between 0.998 and 1.004. If it’s outside that range, let it sit for another 2-3 weeks. At this stage, there isn’t much actual fermenting taking place, since most of the sugars have already been turned to alcohol, but letting it sit will mellow out the flavors and make for a cider that goes down much easier.
Bottle Conditioning & Carbonating Your Cider
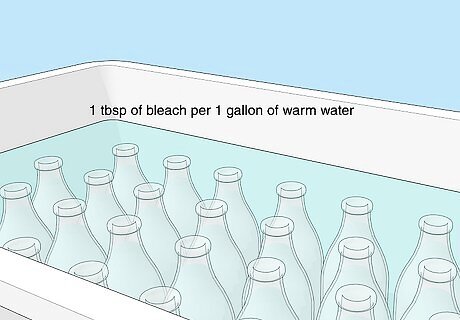
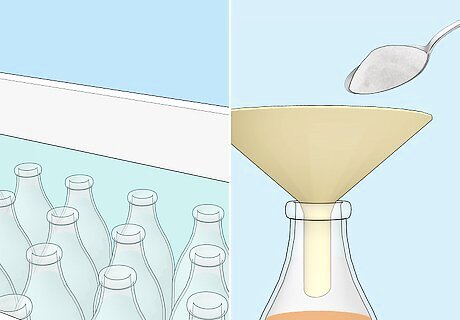
Sterilize your glass bottles in a bleach solution. First, peel and scrub away any labels on your bottles. In a large container, mix 1 gallon (3.8 L) of warm water and 1 tablespoon (15 mL) of bleach. Then, submerge and soak your glass bottles in the solution for about 10 minutes. Thoroughly rinse the bottles with water that has been boiled to finish sanitizing them. Sanitizing your bottle ensures there’s no foreign bacteria present when you bottle your cider, which can contaminate and spoil your batch. Use old cider bottles, or store-bought bottles made specifically for fermented beverages, which can withstand the pressure of fermentation. Bottle conditioning works well for sweet and carbonated ciders, dry and carbonated ciders, and dry and still ciders. To bottle sweet and still ciders, jump to Bottling Sweet, Still Cider.
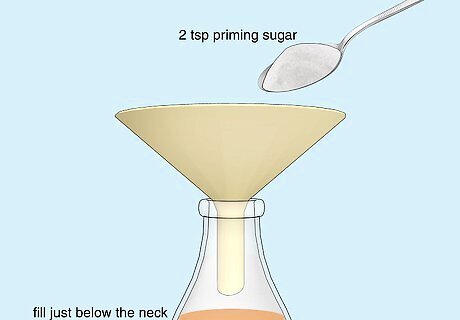
Pour cider and 2 tsp (10 g ) of priming sugar into each bottle. Use a funnel to fill each sanitized bottle with your cider. Fill each bottle to just below the neck. Then, spoon or funnel 10 g (2 tsp) of priming sugar into each bottle. The residual yeast will ferment this sugar, expelling CO2, which carbonates the cider in the bottle. Adding sugar makes for a sweet cider, but skip it if you want a dry, still cider. If you want a dry, still cider (in other words, one that’s not carbonated and not sweet), skip the added sugar and go straight to adding the caps. For an unsweetened, fizzy cider, add ½ tsp (~2g) of dextrose to the bottles instead of priming sugar. The dextrose will ferment and add carbonation, without adding too much sweetness. It’s not necessary to add additional yeast in this step. There’s still yeast in your twice-fermented cider, it just needs some sugar to wake it up!

Cap the bottles and let them sit for 2 weeks. If you’re using flip-top bottles, just flip those tops and place your bottled cider somewhere dark to let the yeast do its thing. Otherwise, use a bottlecap crimper—place the bottle on the stand, and place a bottlecap on top. Then, press down the lever to crimp the cap over the mouth of the bottle. Let the bottles sit at room temperature (70 °F (21 °C)) for 2 weeks to give the yeast time to fizz up the cider, after which the bottles are ready to drink. If you’re letting your bottles sit for longer, open them at least once a week anyway to prevent excess carbonation from building up inside the bottle. Never use corks, twist-on caps, or canning jars to bottle your cider. These aren’t built to withstand the pressure of this last fermentation, and will make a mess or even explode.
Bottling Sweet, Still Cider
Sterilize your bottles and fill them with cider and sugar. Sterilize your bottles by boiling them for 10 minutes, then let them cool and dry for 20-30 minutes. Then, funnel or siphon your cider into the bottles, filling them up to their necks. Finally, add sugar to taste—start with 1 tsp (5 g) and swirl the bottle to combine, then take a sip to test its flavor. If necessary, add another 1 tsp (5 g) to sweeten it further. Alternatively, sweeten the cider with an equal amount of Splenda. While not as full-bodied, Splenda contains no “real” sugar, and so you can skip the next pasteurization step.

Pasteurize the bottle in a hot water bath on the stove. Boil a large pot of water on the stove. Once boiling, submerge each filled bottle into the water up to their necks (you may have to do this 1 at a time, holding each bottle with tongs). Stick a digital thermometer into the bottle as you heat it, and hold it there until the cider inside the bottle reaches 66 °C (151 °F), which will take around 5-15 minutes, depending on your local elevation. Heating the bottle this way kills any yeast still present in the cider, preventing further fermentation and carbonation, making for a still beverage.

Cap the bottles and lay them on their sides for 1 hour. Remove the bottles from the hot water bath, then cap them—flip the top on flip-top bottles, or use a bottlecap crimper for metal caps. Then, place the bottles on their sides for about an hour. This helps sterilize the neck of the bottle, and kill any remaining yeast. After that, your bottles are ready to drink! Afterward, store your bottles in a cool, dark place until you’re ready to drink them. Never use corks, twist-on caps, or canning jars to bottle cider. Though you’ve pasteurized the yeast, some may still remain, and these tools aren’t built to contain the pressure of residual fermentation.


Comments
0 comment